Thursday, February 28, 2013

Thoughts of Spring Cleaning...

Lately, I have been creating a Spring Cleaning List to post.  I have received a few emails from friends and family with some wonderful tips that I have been saving to share with you.  Then this morning my awesome neighbor Jackie emailed me a great cleaning idea to share with you as well. 

This really made me even more excited to SPRING CLEAN and I cannot keep these to myself anymore!  So in the coming weeks I will share some reminders, tips, and natural OCDelightful motivation to help you through your Spring Cleaning:)

I know you are on the edge of your seat...so I will share Jackie's tip with you to hold you over;) 
 
Double Duty Cleaning!!!

This is for anyone with a Drip Coffee Maker & Refrigerator w/Drip Tray.  Cleaning your drip coffee maker should be done every month, but at the very least it can be cleaned every three months. 

The reason is mineral deposits from water and coffee residue can build up in the components of your coffee maker and over time, these can not only affect the taste of the coffee, but it can also impair your brewer's drip operation. housewares.about.com

You can purchase mineral removers from the store but the cheapest method (Jackie uses this method as well) is making a vinegar and water solution


  1. Make sure your coffee maker is rinsed and empty.  Remove the permanent coffee filter and water filter, if your maker has these.
  2. Fill the water reservoir with a solution of equal parts of water and regular white household vinegar.
  3. Run it through a drip cycle.
  4. When the cycle is finished, turn off your coffeemaker but allow the water/vinegar to sit in the carafe for a few minutes, to remove any scale deposits, then discard the solution.
  5. Then you should run clear water (no vinegar) through your coffee maker at least twice, allowing your brewer to cool down between cycles. This will remove any lingering vinegar residue.
  6. This is a good time to thoroughly wipe the exterior of your coffee maker and clean the removable filter basket, permanent filter and carafe with hot soapy water. A change of water filter is also a good idea if applicable.
  7. Your coffee maker is back in operation and coffee should taste much better.
How to Clean a Coffee Maker

Now for Jackie's tip...if you have refrigerator/freezer with an ice and water dispenser then you know the drip tray can get the build up of hard water.  Take the hot cycled water and vinegar solution from the coffee maker and pour some of it into the refrigerator drip tray.  Let is soak for a few minutes and then wipe clean. 

Cannot get any easier that this.  Do this now and you can check it off our Spring Cleaning List before we even start.


Saturday, February 23, 2013

Week 18 Themed Menu & Recipes

Here is another week of delicious meals that are quick and easy.  Take note while reading through.  There are a few meals that can be made ahead during the day or even be a freezer meal.  I am running low on make ahead meals so I know this will be a great week for us.
 
NEW Weekly themes are as follows:
  • Mediterranean Monday - We will mostly do Italian or Greek dishes but this day opens you up to try almost any dish.
  • Tokyo Tuesday - Asian inspired dishes
  • Wrap it Up Wednesday - Wraps, Sandwiches, Burgers, Salads, etc...
  • Taco Thursday - Spanish inspired dishes
  • Free for All Friday - This day is used for leftovers, dining out, or pot luck
  • Slow Cooker/Simmer Saturday
  • Seafood Sunday

***Saturday and Sunday are interchangeable depending on your families schedule that week.
 
As always, at the end of each recipe there will be a link to direct you to the site where I found these meals. You can print from the blog page or from the link that I provided.

Notes
  1. My daughter has a peanut allergy so we substitute and/or omit items that may be in a particular recipe, please do the same if you or anyone in your family has any allergies/dietary needs/personal preference (vegetarian).
  2. Some meals that I put on the menu will be my first time making them as well. So feedback is always appreciated
  3. If there is a meal that I know my kids will not eat I will make a "kid friendly" version of it for them, I will make note of this within the recipe.
  4. All families grocery budgets vary so please adjust ingredients or brands to fit the needs of your family.
  5. The majority of the meals are 30 minutes or less. Meals that do take longer will have steps to help you prepare ahead of time. We all have busy schedules!!!
Monday - Lasagna Bolognese and Spinach Salad
 
Ingredients
  • 3 tablespoons EVOO
  • 4 ounces pancetta, finely chopped
  • 1 small onion, finely chopped
  • 1 carrot, finely chopped
  • 1 rib celery, finely chopped
  • 1 clove garlic, minced
  • 1 bay leaf
  • 1/2 teaspoon dried thyme
  • 1 pound 85% lean ground beef chuck
  • 1 can (28 oz) crushed tomatoes
  • salt and pepper
  • 4 tablespoons butter
  • 1/4 cup flour
  • 2 1/2 cups whole milk, warmed
  • 1 1/4 cups grated parmesan
  • 3/4 pound dried lasagna noodles
  • 1 package of fresh spinach, prepared for your salad of choice
 
Directions
  1. In a deep skillet or pot, cook 1 tbsp. EVOO and the pancetta over medium heat, stirring, until the pancetta is lightly browned, about 5 minutes. Add the onion, carrot, celery, garlic, bay leaf and thyme and cook, stirring, until the veggies are softened, about 5 minutes; push to the side of the pan. Increase the heat to medium-high. Add 1 tbsp. EVOO to the center of the pan and crumble in the ground beef; cook without stirring for 3 minutes. Break up the meat and continue to cook, stirring occasionally, until well browned, about 3 minutes.
  2. Add the tomatoes and 2 cups water to the skillet; simmer, stirring occasionally, until thickened, about 30 minutes. Discard the bay leaf; season with salt and pepper. Remove from the heat; let cool.
  3. Meanwhile, in a medium saucepan, melt the butter over medium heat. Add the flour and cook, whisking constantly, for 1 minute. Whisk in the milk in a steady stream and simmer for 2 minutes, whisking. Remove from the heat, stir in 1 cup parmesan and season with salt and pepper. Let cool, stirring occasionally to prevent a skin from forming.
  4. In a pot of boiling, salted water, add the remaining 1 tbsp. EVOO and the lasagna noodles. Cook, stirring, until al dente. Drain and transfer to a bowl of cold water.
  5. Preheat the oven to 400 degrees . Grease a 9-by-13-inch baking dish; add 34 of the cup meat sauce to coat. Add a layer of noodles, overlapping slightly. Top with 1 cup of the meat sauce, then a layer of noodles; add 1 cup of the bechamel, spreading to coat. Repeat the layers. Add a fifth layer of noodles and top with the remaining meat sauce; dollop with the remaining bechamel. Cover with greased parchment, then wrap the pan with foil.
  6. Make ahead until this point if using for a Make Ahead Meal, freeze and label it.  OR Bake for 1 hour; uncover and sprinkle with the remaining 14 cup parmesan. Bake for 15 minutes more. Loosen the foil; let stand for 30 minutes before slicing.
  7. Serve with your spinach salad

* I also found that I can split this meal and make one for dinner tonight in an 8x8 pan and then use another (disposable) 8x8 pan for the remaining ingredients and freeze that portion.  This gives me two meals for the price of one.

Serves 8 (in a 13x9 pan) or 4 in an 8x8 pan, Ready in 1hr 15 minutes
Rachael Ray Magazine lasagnabolognese

Tuesday - Rotisserie Chicken Potstickers
 
Ingredients
  • Rotisserie Chicken, shredded
  • Handful of chopped cilantro
  • 1 onion, sauteed
  • 1 tbls of ginger, grated
  • Soy sauce, to taste
  • Wonton Wrappers
  • Soy sauce (for dipping)
  • 1 package of stir fry veggies, steamed and seasoned
 
Directions
  1. Mix shredded chicken with chopped cilantro, sautéed onions, and ginger, and season with soy sauce.
  2. Seal in store-bought wonton wrappers and pan-fry in vegetable oil.
  3. Serve potstickers with vegetables.
*Make Ahead/Freezer Meal ALERT...this will make roughly 24 potstickers.  Take half and lie on a baking sheet to freeze.  Once frozen place potstickers in a freezer bag and label. 
 
Serves 4 (with extra for the freezer), Ready in 30 minutes
 
Wednesday - Steak Salad with Horseradish Dressing
 
Ingredients
 
Horseradish Dressing
  • 1/2 cup sour cream
  • 3 tablespoons prepared horseradish
  • 1 tablespoon chopped fresh chives
  • 1 teaspoon honey
  • 1teaspoon red wine vinegar
  • Kosher salt, freshly ground pepper
 
Steak Salad
  • 2 tablespoons olive oil, divided
  • 11-pound rib-eye, flank, or skirt steak
  • Kosher salt, freshly ground pepper
  • 12 ounces fingerling potatoes, thinly sliced
  • 1/2 English hothouse cucumber, thinly sliced
  • 6 radishes, cut into thin wedges
  • 2 cups greens (such as arugula or torn Bibb lettuce leaves)
 
Directions
 
Horseradish Dressing
  1. Whisk sour cream, horseradish, chives, honey, and vinegar in a small bowl; season with salt and pepper.
Steak Salad
  1. Heat 1 tablespoon oil in a large skillet, preferably cast-iron, over medium-high heat. Season steak with salt and pepper. Cook over medium-high heat until cooked to desired doneness, 5-8 minutes per side for medium-rare rib eye, about 4 minutes per side for flank steak, or 3 minutes per side for skirt steak. Transfer meat to a plate and let rest for 10 minutes.
  2. While steak rests, wipe out skillet and heat remaining 1 tablespoon oil over medium-high heat. Add potatoes, season with salt, and cook, tossing occasionally, until tender, 8-10 minutes.
  3. Slice steak and serve with horseradish dressing, potatoes, cucumber, radishes, and greens.
*Kid Friendly Note: serve their salad with their favorite dressing.  Horseradish tends to be too hot for my kids.
 
Serves 4, Ready in 30 minutes
 
Thursday - Fiesta Chili Mac
 
Ingredients
  • 1 lb. lean ground beef (I am using Ground Turkey)
  • 1 clove garlic, minced
  • 1 jar (16 oz.) Chunky Mild Salsa
  • 1 jar (8 oz.)  Taco Sauce
  • 1 can (15 oz.) black beans, rinsed, drained
  • 3/4 cup elbow macaroni, uncooked
  • 1-1/2 cups water

Directions

  1. COOK meat and garlic in 3-quart saucepan over medium heat 8 to 10 minutes or until meat is evenly browned; drain.    
  2. ADD remaining ingredients; mix well. Bring to a boil. Reduce heat to low. Cover; simmer 15 minutes, stirring occasionally. 
  3. Serve with optional toppings: shredded cheese and sour cream.   
 
Serves 4-6, Ready in 35 minutes
Kraft Recipes fiestachilimac
 
Friday - Free for All
 
 
Take this day off of cooking and use up the leftovers from the week
OR get pizza delivered for a fun family night!!!
 
Saturday -  Slow Cooker Maple & Brown Sugar
Pork Tenderloin
 
Ingredients

  • 2 pork tenderloins, about 1 pound each
  • salt and pepper
  • 1 small clove garlic, minced
  • 4 tablespoons grainy Dijon mustard or country-style
  • 2 tablespoons honey
  • 2 tablespoons brown sugar
  • 1 tablespoon cider vinegar or balsamic vinegar
  • (I used Champagne Orange vinegar)
  • 1/2 teaspoon dried leaf thyme, crumbled
  • 1 tablespoon pure maple syrup or Maple Sugar Seasoning
  • 1 tablespoon cornstarch
  • 1 tablespoon cold water
  • 2-3 Sweet potatoes, peeled/mashed/seasoned
  • 1 package of fresh broccoli, steamed and seasoned
 
Directions
 
  1. Wash and trim the pork and pat dry; sprinkle lightly with salt and pepper. Place pork in the slow cooker. Combine garlic, mustard, honey, brown sugar, vinegar, thyme and maple syrup; pour over the pork. Turn pork to coat thoroughly. Cover and cook on LOW for 7 to 9 hours, or on HIGH for 3 1/2 to 4 1/2 hours.
  2. Remove pork to a plate, cover with foil, and keep warm. Pour the juices into a saucepan and bring to a boil over medium heat. Simmer for 8 to 10 minutes, or until reduced by about one-third. Combine the cornstarch and cold water; whisk into the reduced juices and cook for 1 minute longer. Serve pork sliced with the thickened juices.
  3. Also serve this pork tenderloin with mashed sweet potatoes and steamed broccoli

 
Serves 4-6, Ready in 7-9 hours on low or 3.5-4.5 on high
What's Cookin Chicago? mapleandbrownsugarporktenderloin
 
 
Sunday - Seared Rainbow Trout with Herbed Butter & Lemon


Ingredients

  • 2 10-ounce trout filets
  • salt and pepper
  • 1/4 cup all-purpose flour
  • canola oil (or olive oil, but I was out of everything but extra-virgin--not good for frying)
  • 1 tablespoon butter, melted
  • 2 tablespoons capers, drained
  • juice of 1 lemon
  • 1 shallot, chopped (optional)
  • chopped fresh herbs (I used about a tablespoon each fresh flat-leaf parsley and fresh chives)
  • 1 box Near East Rice Pilaf, prepared to package directions
Directions
  1. Place trout, skin side down, in a shallow dish. Season trout with salt and pepper. Sprinkle lightly with flour (you'll shake much of the flour off before cooking).
  2. Heat a cast-iron skillet over medium heat. Add approximately 1 tablespoon oil to skillet and place fish into skillet, skin side up.
  3. Meanwhile, combine remaining ingredients (butter through fresh herbs) in a small bowl.
  4. Cook trout for approximately 4 minutes on medium to medium high. Turn, placing skin side down. Top of trout should be a golden brown. Add butter sauce to skillet, pouring some over trout and some around. Turn heat down to medium-low and cook for approximately 5 minutes.
  5. Serve immediately with prepared rice pilaf.
 
Serves 4, Ready in 30 minutes
 
Hope you enjoy and have a SUPER week!!!
 

Wednesday, February 20, 2013

Checklist for Vacation!


Since Spring Break is only 30 days away (for some) I thought I would share with you a helpful checklist that I use for our vacations/trips.

My family takes a fair amount of weekend trips or vacations throughout the year.  I found that I was always writing a packing list to make sure we never forgot anything that we would need.  Then the hubby suggested that I make a spreadsheet and save it.  It was so obvious...I am a little embrassed that I did not think of it.  Alas, I made the spreadsheet and ever since then, the stress of packing and thinking of everything we need was greatly reduced.


My checklist covers everything you may need on an upcoming trip.  Whether we are traveling by car or plane, winter or summer, when I need my checklist I can just go to the computer and print it out.  If we travel in the summer by car I can cross off the items that pertain to traveling in the winter by plane and vice versa. 


The back side of the sheet is blank so I can add any other miscellaneous items that we may need.  For example, when we travel I also plan a grocery list and meals (i.e. pasta salads, sandwiches, and snacks) so we are not eating out every meal while we are away. 

I have found many templates online for packing lists, but I obviously favor mine.  Hopefully my list will either be exactly what you need or give you ideas of what you may need on your own personal vacation checklist.

Click here for OCDelightful Vacation Checklist

Safe Travels!!!
 

Saturday, February 16, 2013

Week 17 Themed Menu & Recipes

Welcome back!  We are moving on to another week, and I am continuing to gain new followers, especially facebook.  YAY!!!  Thank you all!  Here is this coming weeks menu.  Let me know what you have tried and what you thought.  I look forward to your feedback.
 
Quick Reminder
 
NEW Weekly themes are as follows:
  • Mediterranean Monday - We will mostly do Italian or Greek dishes but this day opens you up to try almost any dish.
  • Tokyo Tuesday - Asian inspired dishes
  • Wrap it Up Wednesday - Wraps, Sandwiches, Burgers, Salads, etc...
  • Taco Thursday - Spanish inspired dishes
  • Free for All Friday - This day is used for leftovers, dining out, or pot luck
  • Slow Cooker/Simmer Saturday
  • Seafood Sunday
***Saturday and Sunday are interchangeable depending on your families schedule that week.
 
As always, at the end of each recipe there will be a link to direct you to the site where I found these meals. You can print from the blog page or from the link that I provided.
 
Notes
  1. My daughter has a peanut allergy so we substitute and/or omit items that may be in a particular recipe, please do the same if you or anyone in your family has any allergies/dietary needs/personal preference (vegetarian).
  2. Some meals that I put on the menu will be my first time making them as well. So feedback is always appreciated
  3. If there is a meal that I know my kids will not eat I will make a "kid friendly" version of it for them, I will make note of this within the recipe.
  4. All families grocery budgets vary so please adjust ingredients or brands to fit the needs of your family.
  5. The majority of the meals are 30 minutes or less. Meals that do take longer will have steps to help you prepare ahead of time. We all have busy schedules!!!
Monday - Slow Cooker Chicken Parmesan
w/Mixed Green Salad


Ingredients

  • 4-6 boneless, skinless chicken breast halves
  • 1 cup Italian seasoned bread crumbs
  • 1/2 cup Parmesan cheese
  • 1/2 tsp. black pepper
  • 1/2 tsp. kosher salt
  • 2 Tbl. olive oil
  • 2 egg, beaten
  • sliced or shredded mozzarella cheese
  • favorite jarred marinara sauce (23 oz.) (we used 2 jars)
  • 1lb of spaghetti, cooked (or whichever pasta you prefer)
  • Mixed greens
  • Salad dressing of choice (we like balsamic)
Directions
  1. Spread the olive oil into the bottom of your crock pot stoneware insert. 
  2. Beat the egg with a fork in a separate bowl. 
  3. Mix the bread crumbs with the seasonings and the Parmesan cheese in another separate dish. 
  4. Dip the chicken into the egg, then into the bread crumb mixture, coating both sides with crumbs, cheese and seasonings. 
  5. Place the chicken breast pieces in the bottom of the crock pot. Layer 2-3 slices or 1-2 cups of mozzarella cheese on top, depending on how much cheese you like. Cover chicken and cheese with entire jar of marinara sauce. Close lid and cook on low for 4-5 hours or high for 2-3. Serve with your favorite pasta and a mixed green salad.
Side note:  I adjusted the amount of chicken and seasonings accordingly.

Serves 4, Ready in 4-5 hours
Six Sisters Stuff and A Year of Slow Cooking 
http://crockpot365.blogspot.com/2008/02/chicken-parmesan-crockpot-recipe.html  slowcookerchickenparmesan
 
Tuesday - Steak and Peppers in Black Bean Sauce
Ingredients
  • 1 pound beef (thinly sliced)
  • 2 tablespoons soy sauce
  • 1 teaspoon sugar
  • 1 tablespoon Chinese rice wine or dry sherry
  • 1 tablespoon cornstarch
  • 1 tablespoon oil
  • 1 tablespoon oil
  • 1 tablespoon oil
  • 1 onions (chopped)
  • 2 tablespoons garlic (chopped)
  • 2 tablespoons ginger (chopped)
  • 2 tablespoons black bean sauce (found in Asian isle of grocery store)
  • 2 green bell peppers (cut into bite sized pieces)
  • 1/2 cup chicken stock
  • 2 cups of rice, prepared (your choice of brown or white)
  • * soy sauce to taste

Directions
 
1. Marinate the beef in the soy sauce, sugar, rice wine, cornstarch and oil while you chop everything.
2. Heat the oil in a pan.
3. Saute the beef until almost cooked and set aside.
4. Heat the oil in the same pan.
5. Add the onions and saute until tender, about 5-7 minutes.
6. Add the garlic, ginger and black bean sauce and saute until fragrant, about 1 minute.
7. Add the green bell peppers and saute for a minute.
8. Add the beef and chicken stock.
9. Cover and simmer for a few minutes.
10. Season with soy sauce to taste and serve on top of prepared rice.
Serves 4, Ready in 30 Minutes
Closet Cooking steakpeppersandblackbeansauce

Wednesday - Steak Pizzaiola Burgers
w/Steamed Broccoli
 
Ingredients
  • 5 tablespoons extra-virgin olive oil (EVOO), divided
  • 2 large onions, thinly sliced
  • Salt and freshly ground black pepper
  • 3 tablespoons tomato paste
  • 3/4 cup dry Italian red wine
  • 2 pounds ground sirloin (93% lean or greater)
  • 1/2 cup pepperoni, finely chopped
  • 1/4 cup (about a handful) Italian parsley, chopped
  • 1 teaspoon dried oregano, crushed up slightly with your fingers
  • 1 teaspoon crushed red pepper flakes
  • 4 tablespoons (1/2 stick) butter
  • 3 to 4 cloves garlic, finely chopped or grated
  • 4 slices sesame semolina bread, each about an inch thick
  • 1 cup grated Parmigiano-Reggiano
  • 8 slices deli provolone
  • 1 bag of fresh broccoli florets, steamed and seasoned with s&p (or prepared to your liking)
Directions
  1. Preheat broiler.
  2. Place a large pan over medium-high heat with 2 tablespoons EVOO, about 2 turns of the pan. Add the onions and season with salt and freshly ground black pepper. Place a lid or piece of aluminum foil over the pan and cook the onions, stirring occasionally, until they start to soften, 2-3 minutes. Remove the lid or foil from the pan and continue cooking until fully softened, another 4-5 minutes.
  3. Add the tomato paste to the pan and cook, stirring occasionally, until it smells sweet and has caramelized slightly, 2-3 minutes. Add the wine and scrape the pan with a wooden spoon to remove any bits that may be stuck to the bottom. Cook until the wine has almost completely evaporated, 3-4 minutes. Remove the onions from the heat, cover them again with the lid or aluminum foil and reserve until ready to serve.
  4. Place a large skillet over medium-high heat with three turns of the pan of EVOO, about 3 tablespoons. In a large mixing bowl, combine the ground sirloin, pepperoni, parsley, oregano and red pepper flakes. Season the meat with salt and freshly ground black pepper, then flatten the meat down in the bowl and score it into four using the side of your hand. Form a patty with each of the four portions of the meat and place them into the hot skillet. Cook until desired doneness, 4-5 minutes per side for medium.
  5. While the burgers are cooking, place a small pot over medium heat with the garlic. Melt the butter then remove the pot from the heat to allow the garlic flavor to infuse the butter. While the butter is melting, place the bread slices on a baking sheet and toast them under the broiler until golden brown on each side. Brush the toasts with the garlic butter and sprinkle the grated cheese over each of them.
  6. Place four toasts back on the baking sheet and top each with one of the burgers. Divide the onion mixture between the four burgers and top each one with two slices of cheese. Place the burgers back under the broiler to melt the cheese.
  7. Serve burgers with a knife, fork, and broccoli.
 
Serves 4, Ready in 30 minutes
Rachael Ray steakpizzaiolaburgers

Thursday - Mexican Chicken Stuffed Shells
 
Ingredients
  • 4 cups chicken breast, cooked and chopped (or store bought rotisserie)
  • 1 can black beans, rinsed and drained
  • 6 green onions, diced
  • 1/2 each of red, green, yellow, & orange bell peppers (or 2 whole bell peppers of your choice), diced
  • 3 (8 oz.) blocks cream cheese, softened (not melted)
  • 2 cans diced tomatoes with chiles (don’t drain) (Rotel or store brand, either works)
  • 1/4 - 1/2 cup chicken stock
  • 1 tsp cumin
  • 1 1/2 cups sharp cheddar cheese, shredded
  • 1 cup of picante sauce
  • 38 large pasta shells, cooked al dente
Directions
  1. Cook pasta shells in well salted, boiling water until al dente (still have a little bite to them) If you cook them too long, they will be difficult to stuff, plus they will have additional cooking time, once they are stuffed. Drain the pasta and set aside while you make the filling.
  2. Cook, drain and dice enough chicken breast to make 4 cups.
  3. To make the filling, mix diced chicken, drained black beans, green onions, diced peppers, and cumin in a large mixing bowl. Thoroughly incorporate all the ingredients.
  4. In a separate bowl, mix the cream cheese, chicken stock and undrained tomatoes with chiles. When thoroughly combined, pour it over the chicken mixture and mix well. (If you have trouble incorporating the cream cheese and tomatoes, you can heat it slightly in the microwave.)
  5. Spread 3/4 c. picante sauce in the bottom of a large baking pan. (I used 13x18x2, but I’m guessing that two 9×13′s would also work.) Reserve the final 1/4 cup, for later.
  6. Using a spoon, or your fingers, fill each of your cooked and cooled pasta shells, setting them into the picante covered pan. Continue until all shells are filled and arranged in the pan.
  7. When the pan is full, drizzle the shells with the remaining 1/4 cup of picante and then sprinkle with the shredded cheddar cheese. Can be made ahead up to this point until ready to bake.
  8. Cover the baking pan tightly with foil and bake at 350 degrees for about 30 minutes or until hot and bubbly.
Serves 12-15  Adjust ingredients accordingly OR freeze the extras for a dinner later on!!!
Ready in 60 minutes
 
Friday - Free for All -TGIF!!!
Take this day off of cooking and use up the leftovers from the week
OR treat your family to a night out for dinner!!!
 
Saturday - Crockpot Cheese Tortellini
 
Ingredients

  • 1 bag of frozen tortellini
  • 1 small bag of fresh spinach
  • 2 cans of italian style diced tomatoes
  • 1 box or 4 cups or chicken broth
  • 1 block of cream cheese, cubed
  • 1 lb. of roll sausage
Directions
  1. Brown the sausage, drain
  2. Then add all ingredients to the crock pot.
  3. Cover and cook on low for 5-6 hrs.
Serves 4, Ready in 5-6 hours
Little Fellows crockpotcheesetortellini


Sunday - Catfish Tacos
 
Ingredients
 
Coleslaw:
  • 3 cups angel hair coleslaw mix
  • 1/2 cup thinly sliced red onion
  • 4 radishes, thinly sliced
  • 3 tablespoons minced fresh cilantro, optional
  • 2 tablespoons fresh lime juice (about 2 limes)
  • 1 teaspoon honey
  • 1/4 teaspoon salt
  • 1/4 teaspoon cracked black pepper
Creamy Remoulade Sauce:

Catfish:
  • Vegetable oil, for frying
  • 1 (15-ounce) catfish fillet
  • 1 1/2 cups cornmeal
  • 1 to 2 tablespoons Cajun seasoning
  • 6 to 8 Fried Taco Shells
  • Sliced avocado, optional
  • Lime wedges, optional
Directions
  1. For the coleslaw: In a medium bowl, combine the coleslaw mix, red onions, radishes, and cilantro. In a small bowl, whisk together the lime juice, honey, salt, and pepper. Add to the coleslaw mixture, tossing gently to coat.
  2. For the remoulade: In a small bowl, combine the sour cream, garlic, green onions, mustard, lemon juice, and dill. Cover and refrigerate until needed.
  3. For the catfish: In a large Dutch oven, pour the oil to a depth of 2 inches and heat to 350 degrees F.
  4. Cut the catfish into strips. Combine and whisk together the cornmeal and Cajun seasoning. Coat the catfish strips in the cornmeal mixture.
  5. Fry the catfish, in batches if necessary, until golden brown, 2 to 3 minutes. Drain on paper towels. Place 2 to 3 catfish strips in the center of each Fried Taco Shell. Top each evenly with the coleslaw mixture. Dollop with the remoulade. Serve with sliced avocado and lime wedges, if desired.   
Serves 4, Ready in 35 minutes
Paula Dean and Food Network catfishtacos

 
Hope you enjoy and have a SUPER week!!!


Saturday, February 9, 2013

Week 16 Themed Menu and Recipes

It's almost the middle of February already!  I had to take a few week hiatus from the blog but we are going to pick up where we left off.  Here are the "new" themes and recipes for this coming week.   

***Since "Fat Tuesday" is this week, we will be skipping our Tokyo theme and having a New Orleans inspired dish:)
 
 
NEW Weekly themes are as follows:
  • Mediterranean Monday - We will mostly do Italian or Greek dishes but this day opens you up to try almost any dish.
  • Tokyo Tuesday - Asian inspired dishes
  • Wrap it Up Wednesday - Wraps, Sandwiches, Burgers, Salads, etc...
  • Taco Thursday - Spanish inspired dishes
  • Free for All Friday - This day is used for leftovers, dining out, or pot luck
  • Slow Cooker/Simmer Saturday
  • Seafood Sunday
***Saturday and Sunday are interchangeable depending on your families schedule that week.


As always, at the end of each recipe there will be a link to direct you to the site where I found these meals. You can print from the blog page or from the link that I provided.

Notes
  1. My daughter has a peanut allergy so we substitute and/or omit items that may be in a particular recipe, please do the same if you or anyone in your family has any allergies/dietary needs/personal preference (vegetarian).
  2. Some meals that I put on the menu will be my first time making them as well. So feedback is always appreciated
  3. If there is a meal that I know my kids will not eat I will make a "kid friendly" version of it for them, I will make note of this within the recipe.
  4. All families grocery budgets vary so please adjust ingredients or brands to fit the needs of your family.
  5. The majority of the meals are 30 minutes or less. Meals that do take longer will have steps to help you prepare ahead of time. We all have busy schedules!!!
Monday - Pork Milanese and Cheesy Orzo


FOR PORK 
 
Ingredients

  • 1 cup panko (Japanese bread crumbs)
  • 1/2 cup finely grated Parmesan
  • 2 large eggs
  • 6 boneless pork loin chops, pounded thin to 1/3 inch-thick (1 1/2 pounds total)
  • Salt and freshly ground black pepper
  • 1/4 cup plus 3 tablespoons olive oil
  • 6 lemon wedges
Directions
  1. Preheat the oven to 200 degrees F.
  2. Coarsely crush the panko into a large shallow bowl. Stir the cheese into the panko. Lightly beat the eggs in another large shallow bowl. Sprinkle the pork generously with salt and pepper. Dip the pork, 1 piece at a time, in the egg, allowing the excess to drip off, then dredge the pork in the crumb mixture, patting to coat completely. Place the pork on a small baking sheet.
  3. Heat 1/4 cup of oil in a heavy large skillet over medium-high heat. Add half of the pork to the hot oil and cook until golden brown and just cooked through, about 3 minutes per side. Transfer to paper towels to drain, then transfer them to a clean baking sheet and keep them warm in the oven. Add the remaining 3 tablespoons of oil to the skillet and fry the remaining pork.
FOR CHEESY ORZO

Ingredients

  • 2 tablespoons extra-virgin olive oil, 2 turns of the pan
  • 1/2 small onion, chopped
  • 2 cloves garlic, chopped
  • 2 cans (14 ounces) chicken or vegetable broth or stock
  • 2 cups orzo pasta (enriched rice may be substituted)
  • 1/2 cup grated Parmigiano or Romano
  • Salt and freshly ground black pepper

Directions

  1. Preheat a 8 inch pot with a tight fitting cover over moderate heat. Add oil, onion and garlic and saute for 2 or 3 minutes. Add broth to the pan and bring to a boil. Stir in orzo and return broth to a boil. Cover pot and reduce heat to simmer. Cook 15 minutes, stirring occasionally, or until liquid is absorbed and pasta tender. Remove lid and stir in cheese. Season with salt and pepper to your taste. You favorite fresh herbs may also be stirred into the orzo or rice to strengthen the flavor even more.
  2. Transfer the pork and orzo to plates and serve with lemon wedges.
***I also make a steamed veggie like green beans or carrots to go with this dish.

Serves 4, Ready in 30 minutes
Food Network---Giada De Laurentiis porkmilanese and Rachael Ray cheesyorzo

Tuesday -  Jambasta
 
A favorite dish of the hubby's, he is going to one happy guy!
 
Ingredients

  • Salt
  • 1 pound penne rigate, pasta with lines
  • 2 tablespoons extra-virgin olive oil, 2 turns of the pan
  • 2 tablespoons butter
  • 1/2 pound andouille sausage, any brand, casing removed and diced
  • 4 cloves garlic, chopped
  • 1 poblano pepper, seeded and chopped or thinly sliced (1 large jalapeno my be substituted)
  • 1 red bell pepper, seeded and chopped
  • 2 ribs celery from the heart with greens, chopped
  • 1 onion, chopped
  • Salt and ground black pepper
  • 2 tablespoons all-purpose flour
  • 1 cup beer, 1/2 bottle
  • 1 cup chicken stock
  • 1 (14-ounce) can, crushed tomatoes
  • 2 tablespoons hot sauce (recommended: Franks Red Hot or Tabasco) eyeball it
  • 2 tablespoons fresh thyme leaves, chopped
  • 1/2 pound chicken breast, diced into small pieces
  • 1/2 pound medium shrimp, cleaned and tails removed
  • 1/4 cup heavy cream, eyeball it
  • 2 scallions, sliced

 
Directions
  1. Heat a pot of water to a boil for pasta and add salt to it then pasta. Cook to al dente and drain.
  2. While pasta works, heat a deep skillet over medium high heat. Add extra-virgin olive oil, butter and andouille. Brown the sausage 2 to 3 minutes to render the fat. Remove with a slotted spoon.
  3. Add garlic, peppers, celery and onions. Saute the veggies for 5 to 6minutes. Season the mixture with salt and pepper and add flour to the pan. Cook flour with veggies 2 minutes more then whisk in beer. Cook beer out, 2 minutes.
  4. Add chicken stock, tomatoes, hot sauce and thyme. Bring liquid to a bubble and add chicken and shrimp. Cook 6 to 7 minutes until chicken is firm and shrimp are opaque and firm. Stir to mix in cooking juices then add in cream.
  5. Drain the pasta and add it to the sauce. Ladle up the jambasta and top with chopped scallions and reserved crispy andouille.
Serves 4, Ready in 30 minutes
Food Network jambasta
 
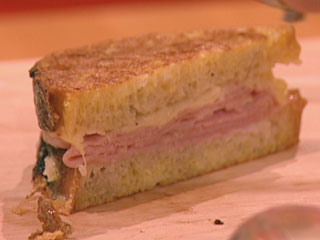
Wednesday - The Ultimate Ham & Cheese Sandwich
w/Fresh Green Salad
 
Ingredients
  • 3 tablespoons butter, divided
  • 2 tablespoons flour
  • 1 cup milk
  • 1 tablespoon Dijon mustard
  • A few grates fresh nutmeg
  • Salt and freshly ground black pepper
  • 8 slices white bread
  • 12-16 slices deli ham
  • 8 slices Swiss cheese or Cheddar Cheese
  • 2 eggs
  • 1 tablespoon raspberry jam
  • 2 tablespoons white vinegar-
  • 1/4-1/3 cup extra virgin olive oil (EVOO)
  • 4-5 cups mixed salad greens
Directions
  1. Place a medium-size pot over medium heat and melt 2 tablespoons butter. Sprinkle the flour over the melted butter and cook for about 1 minute. Slowly whisk the milk and mustard into the butter-flour mixture. Season it with some fresh nutmeg, salt and freshly ground black pepper, and cook for about until it thickens up.
  2. Place four slices of bread on the counter. Spread some of the sauce onto each slice of bread, then lay down some ham, a couple slices of cheese, another smear of sauce and top each sandwich with the remaining bread slices.
  3. Place a large skillet over medium-high heat and melt the remaining tablespoon of butter. In a high-sided dish, whisk up the eggs. Dip the sandwiches in the egg and transfer them to the hot pan. Cook until golden brown, 3-4 minutes per side.
  4. While the sandwiches are cooking, whisk the raspberry jam, white vinegar, EVOO, some salt and freshly ground black pepper in a large salad bowl. Toss the salad greens in the dressing and serve along the ulitmate grilled cheese sandwiches.
Serves 4, Ready in 30 minutes
Rachael Ray  ulitmatehamandgrilledcheese


Thursday -  Slow Cooker Chicken & Black Bean Tacos
 
Ingredients
  • 12 oz raw skinless chicken tenders or breast (I used store bought Rotisserie Chicken)
  • 15 oz can low sodium black beans, drained and rinsed
  • 10 oz can tomatoes with mild green chiles (I used Rotel)
  • 1 1/8 tsp chili powder
  • 3/4 tsp plus 1/8th tsp ground cumin
  • 1/4 tsp garlic powder
  • 1/4 tsp oregano
  • 1 medium scallion, diced
  • 1 tbsp chopped cilantro (optional)
For the Slaw
  • 1 1/3 cups shredded red cabbage
  • 1 tsp red wine vinegar (or lime juice)
  • salt and black pepper, to taste
For the Taco
  • 12 crisp corn or flour taco shells
Optional toppings
  • pico de gallo
  • 1 medium haas avocado, sliced
Directions
  1. Season chicken with pinch of salt, garlic powder, oregano, 1/8 tsp of the chili powder and 1/8th tsp cumin.
  2. Add the beans and tomatoes to the crock pot and season with the remaining chili powder and cumin. Place chicken in the crock pot and cover. Cook on HIGH 2 hours.
  3. Meanwhile, combine shredded cabbage with vinegar (add more to taste), season with salt to taste; set aside.
  4. Remove chicken from the crock pot and shred with two forks (unless you used Rotisserie Chicken). Drain beans and transfer to a platter, or back to the crock pot to keep warm. Top with shredded chicken, scallions and cilantro.
  5. To serve, warm the taco shells according to package directions. Fill with equal amounts of bean and chicken mixture. Top with cabbage and your favorite toppings.
  6. Serve with your favorite chips and salsa.
Serves 4, Ready in 2-3 hours on low
Skinny Taste clowcookerchickenandblackbeantaco

Friday - Free for All -TGIF!!! 
 
Take this day off of cooking and use up the leftovers from the week
OR treat your family to a night out for dinner!!!
 
Saturday - Slow Cooker Buffalo Chicken Chili
 
 Ingredients
  • 2 1/2  lb boneless skinless chicken thighs and/or breast, cut into 1-inch pieces
  • 1 large onion, chopped (about 1 cup)
  • 2 medium stalks celery, sliced (about 1 cup)
  • 2 medium carrots, chopped (about 1 cup)
  • 1 can (28 oz) diced tomatoes, undrained
  • 1 can (15 oz) black beans, drained, rinsed
  • 1 cup chicken broth (from 32-oz carton)
  • 2 teaspoons chili powder
  • 1/2 teaspoon salt
  • 1/4 cup buffalo wing sauce (from 12-oz jar)
  • Crumbled blue cheese, if desired
Directions
  1. Spray 5- to 6-quart slow cooker with cooking spray. In cooker, mix all ingredients except buffalo wing sauce and cheese.
  2. Cover; cook on Low heat setting 8 to 10 hours.
  3. Stir in buffalo wing sauce. Serve sprinkled with blue cheese.
  4. Complete this dish with a small side salad, if desired.
*Kid Friendly Note: add the buffalo sauce to the chili after the kids dishes have been served.  That way it will not be too spicy for them.  Then you can sprinkle the blue cheese on the individual bowls.

Serves 4, Ready in 8-10 hours
Pillsbury slowcookerbuffalochickenchili

Sunday - Salmon and Ravioli
 
Ingredients
  • 9 ouncepackagerefrigerated four cheese ravioli
  • 1 lemon
  • 4- 6 ounces skinless, salmon fillets
  • Salt and ground black pepper
  • 2 tablespoons olive oil
  • 6 ounce package baby spinach
  • 3 cloves garlic, thinly sliced
  • 2 tablespoons butter
  • Shredded Parmesan cheese
Directions
 
1. Cook ravioli according to package directions; drain.
2. Meanwhile, halve lemon. Squeeze juice from one half of the lemon; cut remaining half into small wedges. Set lemon juice and lemon wedges aside. Rinse salmon; pat dry. Sprinkle with salt and pepper.
3. In a large skillet heat olive oil over medium heat; add salmon; cook for 6 to 8 minutes until salmon just flakes, turning once. Remove salmon; add spinach to skillet. Cook 1 minute or until spinach just begins to wilt. Remove spinach from skillet. Add lemon juice, garlic and butter to hot skillet. Cook and stir over medium heat until butter melts. Cook and stir 1 minute more.
4. Slice salmon and divide among 4 plates. Add ravioli and spinach; pour pan juices atop. Serve with lemon wedges and pass Parmesan.
 
Serves 4, Ready in 30 minutes
Better Homes and Gardens salmonandravioli
 
Hope you enjoy and have a SUPER week!!!
 
*Follow me on Facebook and Pinterest*