Saturday, October 27, 2012

Week 8 Themed Menu and Recipes

Last week all the meals on the menu were ones that my family has enjoyed many times.  This week we are trying a few for the first time.  I am looking forward to them and I am sure they will be delicious.  Try them with us!

Also, just a few of the meals take a little longer than the normal 30 minute recipes I try to post.  The AWESOME thing is that they can be prepared ahead of time!  You can make them in the morning or as a freezer meal.  I made notes below:)

*Quick Reminder*

Weekly themes are as follows:
  • Mac-n-Cheese Monday - a jazzed up version of mac-n-cheese each week with a protein
  • Taco Tuesday - Mexican fare
  • Wang Chung Wednesday - Asian fare (sometimes becomes "Wacky Wednesday" and it's pot luck)
  • Tuscan Thursday - Italian cuisine
  • Fish Friday
  • Slow Cooker/Simmer Saturday
  • Sandwich Sundays - this can be anything from burgers to panini's to cold cuts
***Saturday and Sunday are interchangeable depending on your families schedule that week.

As always, at the end of each recipe there will be a link to direct you to the site where I found these meals. You can print from the blog page or from the link that I provided.

Notes

  1. My daughter has a peanut allergy so we substitute and/or omit items that may be in a particular recipe, please do the same if you or anyone in your family has any allergies/dietary needs/personal preference (vegetarian).
  2. Some meals that I put on the menu will be my first time making them as well. So feedback is always appreciated
  3. If there is a meal that I know my kids will not eat I will make a "kid friendly" version of it for them, I will make note of this within the recipe.
  4. All families grocery budgets vary so please adjust ingredients or brands to fit the needs of your family.
  5. The majority of the meals are 30 minutes or less. We all have busy schedules!!!

Monday - Greek Style Mac-n-Cheese
w/Grilled Chicken
 
 
Ingredients
  • 4 boneless chicken breast
  • Montreal Seasoning
  • 2 cups packaged dried elbow macaroni (8 ounces)
  • 1/2 cup chopped onion (1 medium)
  • 2 tablespoons butter or margarine
  • 2 tablespoons all-purpose flour
  • 1/8 teaspoon ground black pepper
  • 2 1/2 cups milk
  • 1 1/2 cups shredded cheddar cheese (6 ounces)
  • 1 1/2 cups shredded American cheese (6 ounces)
  • 1/2 cup pitted Kalamata olives, halved
  • 2 tablespoons crumbled feta cheese
  • Snipped fresh oregano
Directions
 
1. Cook macaroni according to package directions; drain. Set aside. (this can be done ahead to save time and refrigerated until ready to use.) 
2. Meanwhile, preheat oven to 350 degrees F. For cheese sauce, in a medium saucepan cook onion in hot butter until tender. Stir in flour and pepper. Add milk all at once. Cook and stir over medium heat until slightly thickened and bubbly. Add cheeses, stirring until melted. Stir in cooked macaroni and olives. Transfer mixture to an ungreased 2-quart casserole.
3. Bake, uncovered, for 25 minutes or until bubbly. Top with feta cheese and oregano. Let stand for 10 minutes.
4. While mac-n-cheese is baking, Season chicken breast with Montreal seasoning and grill until cooked through.
5. Serve chicken alongside mac-n-cheese.
 
*You can add a vegetable or salad with this dish if you want.
 
Serves 4, Prep 25min, Bake 25min, Total 60min
Better Homes and Gardens  greekstylemacandcheese
 
 
Tuesday - Mexican Stuffed Shells
 
I am making this meal ahead of time...see below
 
Ingredients
  • 1 lb. ground beef
  • 1 package low-sodium taco seasoning
  • 4 oz. cream cheese
  • 14-16 jumbo pasta shells
  • 1.5 cup salsa
  • 1 cup taco sauce (This is a smooth, tomato based sauce found in the Mexican section)
  • 1 cup cheddar cheese
  • 1 cup monterey jack cheese
  • 3 green onions
  • Vegetable of choice, I am doing carrots
  • Sour cream
Directions
  1. Preheat oven to 350°.
  2. In a frying pan cook ground beef; add taco seasoning and prepare according to package directions. Add cream cheese, cover and simmer until cheese is melted. Blend well. Set aside and cool completely. While ground beef is cooking, cook the pasta shells according to directions; drain. Set shells out individually on cutting board/baking sheet so that they don’t stick together.
  3. Pour salsa on bottom of 9×13 baking dish. Stuff each shell with the meat mixture. Place shells in 9×13 pan open side up. Cover shells with taco sauce. *This meal can be made ahead up to this point and be refrigerated until ready to bake or use as a FREEZER MEAL. 
  4. Cover with foil and bake for 30 minutes.
  5. Meanwhile, cook your vegetable of choice.  I am doing steamed carrots.
  6. After 30 minutes, add shredded cheese and bake for 10-15 more minutes, with the foil removed. Top with any condiments you’d like (green onions, black olives, etc.) Serve with sour cream and/or more salsa, and vegetable.
*If you are preparing this meal ahead of time, why not make double and freeze for later?
*If using this meal as a freezer meal do not forget to label and date the meal. 

Serves 4-6, Prep 20mins, Bake 30mins, Total 60mins
The Way to His Heart  mexicanstuffedshells

 
Wednesday - Soy Ginger Flank Steak
w/Grilled Eggplant and Rice
(no picture, I will take one on Wednesday and post for you all)
 
 
Ingredients
  • One 2-pound flank steak
  • 1/2 cup soy sauce
  • 1/4 cup plus
  • 2 tablespoons fresh lime juice
  • 2 tablespoons finely grated fresh ginger
  • 1/4 cup extra-virgin olive oil1 medium eggplant (about 1 1/2 pounds), cut lengthwise into 8 spears
  • Salt and freshly ground pepper
  • 2 cups of riced, cooked to package directions
 
Directions
  1. Using a small sharp knife, score the flank steak on both sides in a shallow crosshatch pattern and transfer to a shallow baking dish. In a small bowl, combine the soy sauce, lime juice and ginger. Pour 2/3 cup of the soy marinade over the flank steak and turn to coat. Let stand for 10 minutes. Reserve the remaining marinade.
  2. Meanwhile, light a grill or preheat a grill pan. Brush 2 tablespoons of the olive oil over the cut sides of the eggplant and season with salt and pepper.
  3. Remove the steak from the marinade and pat dry. Brush the steak with the remaining 2 tablespoons of olive oil and season with pepper. Grill the steak over moderately high heat, turning occasionally, about 11 minutes for medium to medium-rare meat. Simultaneously, grill the eggplant until tender and browned, 11 minutes. Transfer the steak to a cutting board and let rest for 5 minutes. Thinly slice the meat against the grain. Transfer the meat and eggplant to plates, drizzle with the reserved marinade.
  4. Serve steak and eggplant with the cooked rice.
Serves 4, Ready in 30 minutes
 
 
Thursday - Lasagna with Two Sauces
 
This recipe was featured on my first post of "Make Ahead Meals".  I have 2 of these amazing lasagnas in my freezer right now.  I am using one of them tonight.  YUM!  I posted the recipe again for those of you who missed it the first time.  However, this meal takes about 4 hours to prepare that is why its best for a "make ahead" or when you have ample time.
 
I will take this out of the freezer in the morning and leave on the counter to thaw.  Then the hubby will bake as directed below so it is ready when the kids and I get home from their evening activities. 
 
We will have fresh Italian bread from the grocery store bakery with Olive Oil and Parmesan Cheese for dipping.
No cooking tonight and dishes are minimal...SCORE!
 
 
Ingredients
ALFREDO SAUCE:
  • 2 teaspoons extra virgin olive oil
  • 3 roasted garlic cloves (see below)
  • 1 quart heavy cream
  • 1/2 teaspoon freshly grated nutmeg
  • 1 teaspoon dried basil
  • 1 teaspoon dried oregano
  • 1/2 cup finely grated Parmesan cheese
  • 1/4 cup finely grated Romano cheese
  • Salt and freshly ground black pepper
FIRE-ROASTED MARINARA SAUCE:
  • 3 tablespoons extra virgin olive oil
  • 6 roasted garlic cloves (see below)
  • 2 medium carrots, finely diced
  • 1 medium white onion, finely diced
  • 2 celery ribs, finely diced
  • 1 shallot, finely diced
  • 1 tablespoon fresh thyme leaves
  • 1 small bunch basil, cut into chiffonade
  • 1/2 cup sherry
  • 1/2 cup brandy
  • Two 28-ounce cans whole fire-roasted tomatoes with juices
  • 3 plum tomatoes, peeled, seeded, and diced
  • 2 cups low-sodium vegetable stock
  • 1 tablespoon sugar
  • Salt and freshly ground black pepper
LAYERING INGREDIENTS:
  • 1 pound dried lasagna noodles, cooked al dente
  • 8 ounces mozzarella cheese, coarsely grated (about 2 cups)
  • 8 ounces provolone cheese, coarsely grated (about 2 cups)
  • 1 cup finely grated Parmesan cheese
  • 1/2 cup finely grated Romano cheese
  • Freshly ground black pepper
Directions
ALFREDO SAUCE:
  1. In a large saucepan, heat the oil over medium heat. Add the garlic and cook for 2 minutes, breaking it apart with the back of a wooden spoon.
  2. Add the cream and bring to a simmer (do not boil).
  3. Add the nutmeg, basil, and oregano and cook until reduced by about half, about 45 minutes, watching the pot carefully so the cream doesn’t boil over.
  4. Lower the heat, add the grated cheeses, and stir until incorporated. Season with salt and pepper to taste. Set aside.
FIRE-ROASTED MARINARA SAUCE:
  1. While you’re making the Alfredo sauce, in a large saucepan, heat the oil over medium heat. Add the garlic and cook for 2 minutes, breaking it apart with the back of a wooden spoon.
  2. Add the carrots, onion, celery, and shallot and cook until the vegetables are caramelized, about 20 minutes.
  3. Add the thyme and basil and cook for 1 minute, stirring.
  4. Add the sherry and brandy and cook for 5 minutes, scraping any browned bits from the bottom of the pan.
  5. Add the canned and fresh tomatoes, the stock, sugar, and salt and pepper to taste. Bring to a simmer, then reduce the heat and cook for 1 hour, stirring occasionally, to thicken and concentrate the flavors.
  6. Using an immersion blender, blend the sauce directly in the pot. Taste and adjust the seasonings, adding salt and pepper to taste as needed.
  7. Cook for an additional 15 minutes, stirring occasionally, then taste again and adjust the seasonings if needed. Set aside.
LAYERING INGREDIENTS:
  1. Preheat the oven to 350 degrees.
  2. Spread a thin layer of marinara sauce over the bottom of a 13-by-9-by-3-inch baking pan or lasagna pan (disposal foil tin with lid, if freezing).
  3. Follow with a layer of lasagna noodles, overlapping the noodles slightly. Spread a layer of Alfredo sauce over the noodles and top with a layer of marinara sauce. Sprinkle with some of the mozzarella, provolone, Parmesan, and Romano cheeses, followed by a dusting of pepper.
  4. Repeat the layers, reserving some of the marinara sauce and some of the Parmesan and Romano cheeses to cover the final layer of pasta.
*At this point I would take plastic wrap and wrap the lasagna, then place the lid on the tin. Label the tin with the dish name, baking instructions, and date. Then freeze until ready to use. When you are ready to bake this, take it out of the freezer and thaw throughout the day, then bake according to instructions.

BAKING INSTRUCTIONS:
  1. Cover loosely with aluminum foil and bake for 50 minutes, or until starting to bubble, then remove the foil and bake for another 15 to 20 minutes, or until heated through and bubbly on top.
  2. Remove from the oven and let stand for 10 minutes before serving.
ROASTED GARLIC:
  1. Preheat the oven to 375 degrees.
  2. Peel off the papery outer layers of the garlic head and cut off the top 1/2 inch. Place the garlic on a piece of aluminum foil large enough to wrap the garlic. Drizzle with a little olive oil and sprinkle with salt.
  3. Wrap in the foil and roast for 30 to 40 minutes, or until the garlic is soft enough to slide out of the skin when pressed.
Serves 8-10, If prepared ahead of time it takes only 1hr 10min to bake.
Dave Martin, Top Chef, Season 1, Episode 4 twosaucelasagana
 
Friday - Roasted Salmon w/Lemon Relish
on a Bed of Spinach
 

Ingredients

  • 1/4 cup pine nuts (optional)
  • 1/4 cup raisins or craisins
  • Slivered zest and juice of 1 lemon
  • 4 skinless salmon fillets, (6 ounces each)
  • Coarse salt and ground pepper
  • 1/4 cup chopped fresh parsley
  • 3 tablespoons olive oil
  • 5 ounces baby spinach (about 5 cups), loosely packed
  • 1 box of Near East Parmesan Couscous, prepared (optional)

Directions

  1. Preheat oven to 450 degrees. Spread pine nuts on a rimmed baking sheet; toast in oven, tossing occasionally, until lightly golden, 5 to 7 minutes. Remove from sheet, and reserve. (Omit this step if not using pine nuts)
  2. Meanwhile, place raisins (or craisins) and lemon zest in a small bowl; cover with boiling water. Set aside.
  3. Place salmon fillets on the baking sheet used in step 1; season with salt and pepper. Roast until salmon is opaque throughout, 8 to 10 minutes.
  4. Meanwhile, drain and discard liquid from raisins and lemon zest. Return raisins (or craisins) and zest to bowl; add lemon juice, pine nuts, parsley, and oil. Season with salt and pepper; stir to combine.
  5. Dividing evenly, make a bed of spinach on each of four plates, place salmon fillet on spinach; spoon lemon relish over the top.
  6. If using couscous, serve on the side of the salmon and spinach.
 
*Kid note: I will serve spinach on the side of salmon instead of underneath.
 
Serves 4, Ready in 25 minutes
Martha Stewart Food  roastedsalmonandlemonrelish
 
 
Saturday - Crock Pot Whole Chicken
w/Green Beans & Starch of Choice
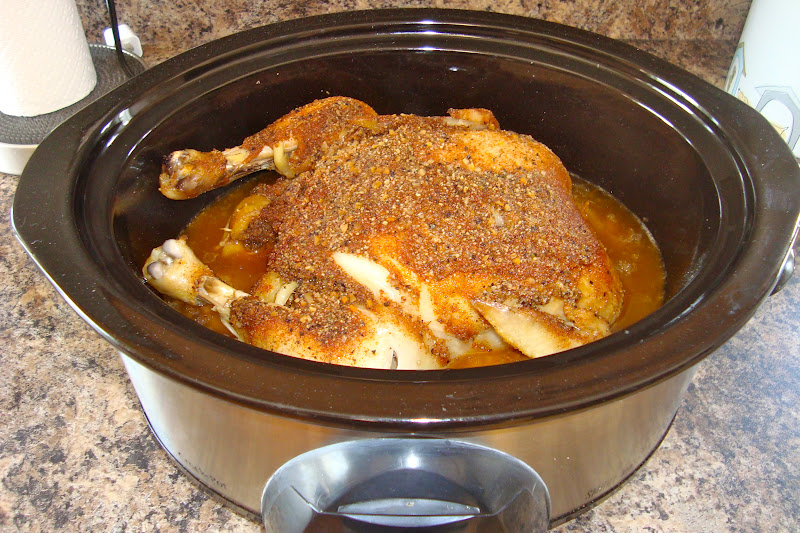
 
Ingredients
  • 1 medium/large whole chicken
  • 1 onion
  • 2 teaspoons paprika
  • 2 teaspoons Mrs. Dash
  • 1 teaspoon salt
  • 1 teaspoon onion powder
  • 1 teaspoon garlic powder
  • 1 teaspoon parsley flakes
  • 1/2 teaspoon pepper
  • Green Beans
  • Mashed potatoes, stuffing, or starch of your choice
Directions
  1. Thaw and clean chicken.
  2. Quarter onion and place inside chicken cavity and place in Crock-Pot.
  3. Mix spices together in small bowl.
  4. Sprinkle spices over chicken. No need to rub, just cover generously. (And you don't need to add any water or liquid.)
  5. Use a meat thermometer to ensure it is thoroughly cooked
  6. 20 minutes before chicken is finished steam green beans and make the starch of your choice.
Serves: 6-8, Prep Time 10 Minutes | Cook Time 4-6 Hours
Prairie Story  crockpotwholechicken
 
 
Sunday - White Pizza Grilled Cheese
 
Ingredients
  • 1/2 cup whole milk ricotta cheese
  • 2 teaspoons extra virgin olive oil
  • 1 small clove garlic, minced
  • 1 tablespoon chopped fresh basil (or 1 teaspoon dried)
  • 2 teaspoons chopped fresh oregano (or 1/2 teaspoon dried)
  • 1/4 teaspoon kosher salt
  • Freshly ground black pepper to taste
  • 1/4 cup shredded Parmesan cheese
  • 8 ounces mozzarella cheese, thinly sliced
  • 8 slices white bread
  • 1 large clove garlic, peeled and halved (for rubbing on the outsides of the bread) (I will not do this on the kids sandwiches)
  • Butter
  • 1 bunch of asparagus
Directions
  1. In a small bowl, mix together the ricotta, olive oil, garlic, basil, oregano, salt, and black pepper. Refrigerate for at least an hour (or up to 24 hours) to allow the flavors to develop.
  2. Lay down the bread slices and, using a butter knife, spread the ricotta mixture evenly on each piece. The ricotta mixture should coat the insides of both pieces of bread. Note: If you’re using large pieces of bread, you may want to make more of the ricotta mixture, or only make two or three sandwiches instead of four).
  3. Lay the mozzarella slices evenly on every other piece of bread (one side of each sandwich). Sprinkle with Parmesan cheese and close the sandwiches by place both cheesy insides together.
  4. Rub the outsides of the sandwiches with the cut side of the garlic clove, then butter both sides generously.
  5. In a large frying pan  or griddle over medium-low heat, cook the sandwiches, flipping often, until they’re golden-brown on the outside and the cheese is melted inside, about 10 minutes.
  6. Steam or saute asparagus, season with salt and pepper, drizzle with olive oil.
  7. Serve immediately.
 
*If I have leftover chicken from Saturday I am going to put it on the sandwiches for extra protein.
 
Serves 4 or make extra for seconds, Ready in 15mins (cheese mixture needs to stand for at least 1hr)
Kitchen Treaty  whitepizzagrilledcheese
 
 
I will have feedback for you next week on what my family thought.  Let me know your thoughts too.
 
Hope you enjoy and have a SUPER week!!!
 
 
Oh and don't forget to tell everyone how much you LOVE this blog!!!  Share it with your friends and family.  You can subscribe by email to be sure you do not miss anything.  You can also follow me on Pinterest. 


Wednesday, October 24, 2012

Overwhelmed with Your Children's Schoolwork?!

How I organized my children's sentimental schoolwork and more.
 

As you know I have two lovely children.  They create the most wonderful and meaningful artwork, drawings, and handwriting.  As the proud momma that I am, I just know they will continue to have major milestones and achievements throughout childhood and their school years. 

Last year was the first year both kids were in school.  I was being bombarded with papers, drawings, homework and notes.  I am so proud of all that they are learning, but I was running out of places to put these great pieces of work.  Plus, on numerous occasions we have gone through mine and my husbands school work from our childhood and the kids get seriously excited.  I had to find a solution to being able to keep what they thought was invaluable.

So, with the combination of my "OCDelightfulness" and Pinterest I found a way to keep my children's "important" papers.  With hopes that in the future they can share it with their kids.  Or toss out, whichever they choose, but at least I did my part.

Okay, so the kids come home, take off their shoes and dump out their backpacks onto the kitchen counter.  Ugh!  Where to begin.  I go through each of their piles and throw out what we do not need.  They bring home monthly reading logs, spelling words, and the lunch calendar.  Where are we supposed to put those for an entire month, while remembering to fill them out daily (or weekly)? 

Ah Ha!!!
 
I took two 3M hooks, clothespins (pink for my daughter and blue for my son), and clothesline.  This is in my office and at an accessible height for both of the kids.  When they need to fill in one or more of the sheets they can do so on their own.  It is off my counters and desk, it has been a perfect solution.  This plan could also work wherever the kids do their homework or wherever you have enough wall space.


Okay, now onto ALL the other papers that they have!!!  I used to keep the papers in with their other "keepsakes" but that was not a great solution, so on PINTEREST I found how I was going to get these kids papers in a place that they could be saved. 

Bins, colored coded for girl and boy, of course.  Hanging files, file folders, labels, and SUPER cute templates found on iheartorganizing.blogspot.com

Here they are!!!


***I needed 2 file bins, 17 hanging files,  17 file folders, and 17 labels for each child. 
 
I purchased the file bins from Office Depot for around $13.  That is pricey but I needed to have these particular colors, you will find out why at the end of this post.  You can easily use bankers boxes, cardboard file boxes, or clear file boxes from Target.  I purchased the hanging files, file folders, and labels from Walmart.
 
There is a file for each of the following:
  • Miscellaneous
  • Baby ( I included their baby book too)
  • Karate (for my son) and Gymnastics (for my daughter)
  • Pre-K
  • Kindergarten
  • First through Twelfth
I know the files will become less full as they get older and their drawings are not as "cute" but I am sure I will still have achievements and such to put in.

Below I provided the links for the FREE printable template for the labels and a cover sheet for each grade.  I made my own labels for the misc, baby, and karate/gymnastics. 

These are courtesy of another useful and great blog iheartorganizing.blogspot.com


Here is this fantastic app that I use for keeping kids artwork that is just too big.  You can take a picture of it, save it and share it.  You can also make a photobook out of all the artwork you save on this app...Artkive artkiveapp.com


I also keep their professional photos from birth thru school year in their own individual 8x10 scrapbooks. These books are from Michael's and you can purchase additional pages so you can keep adding photos.  It is a great way to keep the pictures in order and damage free.  It is also fun to see the transformation from year to year in only a turn of a page.  ***I put this in the file bin just so everything is in one place.
 
Yet, another OCD organizational thing I do with more kid
"stuff"...


My kids have many "keepsakes" that are not in paper form.  They also have sentimental toys and clothing that they do not use anymore, but I could not part with.  So, I bought large Rubbermaid bins (with extras for the future so they all match) in Purple and Blue for my daughter and son.  These are in storage and whenever I need to add something to their bins I can easily find them.   


Did you notice that the File Bins MATCH the Rubbermaid Bins?!  Hmmmmm... I have a method to my madness!!!
 
 
Everything is in its place and the kids can continue to make masterpieces while not becoming clutter.
 
Doesn't this make you HAPPY?!
 

Saturday, October 20, 2012

Week 7 Themed Menu and Recipes

HELLO!  This week I am posting meals that are oldies but goodies our home.  My family has had each and every one of these numerous times and we love them!!!

Oh, and has anyone noticed there are still NO REPEATS?!  Just thought I would mention it.

Weekly themes are as follows:
  • Mac-n-Cheese Monday - a jazzed up version of mac-n-cheese each week with a protein
  • Taco Tuesday - Mexican fare
  • Wang Chung Wednesday - Asian fare (sometimes becomes "Wacky Wednesday" and it's pot luck)
  • Tuscan Thursday - Italian cuisine
  • Fish Friday
  • Slow Cooker/Simmer Saturday
  • Sandwich Sundays - this can be anything from burgers to panini's to cold cuts
***Saturday and Sunday are interchangeable depending on your families schedule that week.

As always, at the end of each recipe there will be a link to direct you to the site where I found these meals. You can print from the blog page or from the link that I provided.

Notes

  1. My daughter has a peanut allergy so we substitute and/or omit items that may be in a particular recipe, please do the same if you or anyone in your family has any allergies/dietary needs/personal preference (vegetarian).
  2. Some meals that I put on the menu will be my first time making them as well. So feedback is always appreciated
  3. If there is a meal that I know my kids will not eat I will make a "kid friendly" version of it for them, I will make note of this within the recipe.
  4. All families grocery budgets vary so please adjust ingredients or brands to fit the needs of your family.
  5. The majority of the meals are 30 minutes or less. We all have busy schedules!!!

Monday - Strip Steaks w/Side of Blue Cheese Spaghetti
 
Ingredients

  • 4 slices bacon, chopped into 1-inch pieces
  • Salt
  • 1 pound spaghetti
  • 4 (8-ounce) NY strip steaks (or steak of choice)
  • Ground black pepper
  • 2 tablespoons extra-virgin olive oil, 2 turns of the pan
  • 5 tablespoons butter, divided
  • 4 cloves garlic, minced, divided
  • 2 shallots, finely chopped
  • 2 tablespoons all-purpose flour
  • 1/4 to 1/3 cup cream or half-and-half, eyeball it
  • 8 ounces blue cheese crumbles
  • 2 to 3 tablespoons chopped sage leaves
  • 2 tablespoons chives, chopped, a palm full
  • 2 cups arugula (or spinach), a small bunch, cleaned, trimmed and shredded

Directions
  1. Put a large pot of water on the stove to bring to a boil for pasta.
  2. Preheat broiler to high with rack on top shelf.
  3. Preheat medium skillet over medium-high heat. Add chopped bacon and cook until crisp.
  4. Salt water for pasta and add spaghetti to the pot. Cook to al dente, with a bite to it.
  5. Season the steaks with salt and pepper on both sides and arrange on slotted broiler pan.
  6. Remove bacon to paper towel lined plate with a slotted spoon and drain off most of the fat, return pan to heat and reduce heat to medium. Add extra-virgin olive oil, 2 turns of the pan and 1 tablespoon butter. When butter melts into extra-virgin olive oil, add in 2 cloves garlic and the shallots, saute for 3 minutes.
  7. Arrange steaks on the broiler pan. Place under broiler - leave door to oven cracked ajar to limit flare ups and smoke. Cook 4 minutes on each side for medium rare, up to 5 to 6 minutes on each side for medium well doneness.
  8. To the garlic and shallots, add in flour and cook a minute more. Whisk in stock, bring to a bubble, about 30 seconds then stir in the cream. When cream comes to a bubble, add in blue cheese and sage and a few grinds of black pepper. Stir until cheese melts. Reduce heat to lowest setting.
  9. Soften 4 tablespoons butter in microwave on high for 15 seconds. Mix in chives and 2 cloves minced garlic and reserve.
  10. Remove steaks from oven and let rest 5 minutes. Place 1/4 of the chive and garlic butter mixture on each steak to melt down over the meat as they rest
  11. Drain pasta and toss with sauce to coat and combine evenly. Taste to adjust seasoning.
  12. Serve steaks with pasta alongside. Scatter the arugula (or spinach) and bacon bits across the top of the pasta
Serves 5, Ready in 30 minutes
Rachael Ray, Food Network  steakwithbluecheesespaghetti
 
 
Tuesday - BBQ Chicken Quesadilla w/Tropical Fruit Salsa
*no picture available, who will send me one?
 
*I have added some great shortcuts to speed this one up.
 
Ingredients

  • 8 (12-inch) flour tortillas (or whatever size you have on hand)
  • 1/4 cup grated Cheddar, plus 1/4 cup
  • 1/4 cup grated queso blanco (or any Mexican cheese or your choice)
  • 1 Rotisserie Chicken, meat shredded
  • 1 red onion, thinly sliced (optional)
  • 3/4 cup favorite barbecue sauce
  • Tropical Fruit Salsa, recipe follows
*I purchase the jar of tropical fruit in the produce section and use that to make the salsa
  • Cilantro sprigs, for garnish
  • 1 can of refried black beans, warmed and seasoned with salt
  • Sour cream (optional)

Directions
  1. Lay out 2 of the flour tortillas on a flat surface. Top with 1/4 cup of the Cheddar, and the queso blanco spreading evenly over the tortillas. Divide the chicken among the tortillas and sprinkle with the desired amount of red onion (if using). Top with barbecue sauce and remaining 1/4 cup of Cheddar. Top with remaining tortillas and press to seal.
  2. Heat a large saute pan or griddle. Add enough oil or butter to coat the bottom of the pan and lower the heat to medium. Cook until golden brown on both sides, about 3 minutes per side. Repeat with the other quesadillas.
  3. Warm refried black beans in a small sauce pot and top with sour cream and serve alongside the quesadilla's.
  4. Let cool for 5 minutes. Slice into 8 or 10 pieces. Garnish with Tropical Fruit Salsa and cilantro sprigs.
 Tropical Fruit Salsa:
  • 1 jar (or can) of tropical fruit
  • 1 red jalapeno, minced (optional)
  • 1/2 lime, juiced
  • Pinch salt

Combine all ingredients in a food processor and pulse until chunky texture.  Let sit for before serving.
 
*Kid Note: I do not use red onion at all in this recipe and it is still delicious.  I also set aside the kids fruit salsa before I add the jalapeno for the adults.
 
Serves 4, I usually make enough for seconds.  Ready in 30 minutes
Wolfgang Puck, Food Network  bbqchickenquesadilla
 
 
Wednesday - Sweet and Sour Pork w/Rice
 
Ingredients


Directions
  1. Toss the pork with 1/2 tablespoon vinegar and a pinch of salt in a bowl. Mix the remaining 2 tablespoons vinegar, the soy sauce, cornstarch, ketchup, 3 tablespoons sugar, 1/3 cup water and 1/2 teaspoon salt in another bowl.
  2. Heat 2 tablespoons peanut oil (or vegetable oil) in a large skillet or wok over high heat. Add the pork and slowly stir until it turns mostly opaque, about 2 minutes. Remove the pork with a slotted spoon and transfer to a plate. Discard the oil and wipe out the skillet.
  3. Heat the remaining 1 tablespoon peanut oil (or vegetable oil) in the skillet, then stir-fry the garlic with a pinch each of salt and sugar, 15 seconds. Add the carrots and scallions and stir-fry until crisp-tender, 2 minutes. (Add a little water if the garlic starts to stick to the skillet.) Add the pork, snow peas and soy sauce mixture; stir until the pork is cooked through and the sauce is thickened, about 3 minutes.
  4. Serve pork mixture on top of or on the side of prepared rice.
Serves 4, Ready in 20 minutes
Food Network Magazine  sweetandsourpork
 
 
Thursday - You Won’t Be Single For Long"
Vodka Cream Pasta w/Chicken
 
Ingredients
Directions
  1. Heat a large skillet over moderate heat.  Add oil and chicken.  Cook chicken until browned, remove from pan and set aside.
  2. Add to the skillet butter, garlic, and shallots. Gently saute shallots for 3 to 5 minutes to develop their sweetness. Add vodka to the pan, 3 turns around the pan in a steady stream will equal about 1 cup. Reduce vodka by half, this will take 2 or 3 minutes. Add chicken stock, tomatoes. Bring sauce to a bubble and reduce heat to simmer. Season with salt and pepper, and return chicken to the pan.
  3. While sauce simmers, cook pasta in salted boiling water until cooked to al dente.
  4. Stir cream into sauce. When sauce returns to a bubble, remove it from heat. Drain pasta. Toss hot pasta with sauce and basil leaves. Pass pasta with crusty bread.
*The original recipe does not call for chicken, if you would rather not have the chicken just omit it from the recipe.
*The alcohol cooks off when it is reduced so the kids can eat this meal too.
 
Serves 4, Ready in 30 minutes with chicken, 25 minutes w/out chicken
Rachael Ray, Food Network  vodkapasta
 
 
Friday - Parmesan Baked Salmon w/Rice Pilaf
and/or Side Salad
 
 
Ingreidents
Directions
1.  Heat oven to 400°F.
2.  Mix mayo, cheese and pepper until well blended.
3.  Place fish in shallow foil-lined pan; drizzle with lemon juice. Cover with mayo mixture and cracker crumbs.
4.  Bake 12 to 15 min. or until fish flakes easily with fork. 
5.  Serve with your choice of Rice Pilaf and/or Side Salad   
 
Serves 4, Ready in 25 minutes
Kraft Recipes  parmesancrustedsalmon
 
 
Saturday - Crock Pot Chili
 
*To me chili recipes are all subjective, use your own adjustments to make this meal as HOT or NOT as you like.
 
 Ingredients
  • 1-1 1/2 lbs of ground beef (or ground turkey)
  • 1- 15oz can of chili beans, drained (your desired heat level)
  • 1- 15oz can of dark red kidney beans, drained
  • 1- 15oz can of light red kidney beans, drained
  • 1- package of chili powder mix (again your heat level)
  • 1 jalapeno, seeded and diced
  • 1- 15oz can of diced tomatoes with juice
  • 2 cloves of garlic, minced
  • 1 green pepper, sliced
  • 1 yellow onion, sliced
Toppings
  • Grated cheddar cheese
  • Diced onion
  • Sour Cream
  • Oyster crackers
  • Hot sauce
Directions
  1. Plug in and warm the slow cooker on low.
  2. Heat pan and oil, brown ground beef until no longer pink.  Then add the green pepper, onion, jalapeno, and garlic.  Cook until vegetables are softened.
  3. Then transfer meat and vegetables to the slow cooker, add in the remaining ingredients. 
  4. Cover and cook on low for 6-8 hours or on high for 3-4 hours.
  5. Serve with desired toppings
*ALERT*  This could also be used as a "Make Ahead" meal or Freeze the leftovers for later!!!
 
Serves 4-6, Ready in 6-8 hours on low or 3-4 hours on high
Courtesy of my Mom...Thanks Jude:)
 
 
Sunday - MYOP (make your own pizzas)
Buffalo Chicken Pizza for Us and
Pineapple & Cheese for the Kids
 
Ingredients

  • 3/4 pound chicken breast cutlets
  • Extra-virgin olive oil, for drizzling
  • 2 teaspoons grill seasoning, (recommended: McCormick Montreal Seasoning) eyeball it
  • 2 pizza doughs, store bought or from your favorite pizzeria
  • Cornmeal or flour, to handle dough
  • 2 tablespoons butter
  • 1 tablespoons Worcestershire sauce, eyeball it
  • 2 to 3 tablespoons hot sauce, medium to spicy heat
  • 1 cup tomato sauce (1/2 for adult pizza, 1/2 for kids pizza)
  • 2 cups shredded Monterey Jack cheese, a few generous handfuls
  • 1/2 cup blue cheese crumbles
  • 3 scallions, thinly sliced
  • 1 can of pineapple chunks (for my kiddos pizza)
Directions

  1. Preheat oven to 425 degrees F. Preheat grill pan to high.
  2. Place chicken on a plate and drizzle extra-virgin olive oil over the chicken then season with grill seasoning. When grill is hot, add chicken and cook about 3 minutes on each side.
  3. Stretch dough or remove from packaging, depending on which dough you have.  If store bought pierce dough with fork and drizzle on a little olive oil.  Set pizza on pizza pans to the side and clean board.
  4. In a medium skillet over medium heat, melt butter and stir in Worcestershire, hot sauce, and 1/2 the tomato sauce.
  5. Remove the chicken from grill and thinly slice it. Add chicken to sauce and coat. Cover one of the pizza dough with the saucy Buffalo chicken, cheeses, and scallions.
  6. Let the kids make the other pizza by using the remaining tomato sauce, some dried oregano, dried basil, cheese, and pineapple (if using).
  7. Bake both pizzas at the same time for 18 minutes or until crisp.
  8. Pick your side tonight!!!
 
Serves 4, Ready in 30 minutes
Rachel Ray, Food Network  makeyourownpizza
 
 
Hope you enjoy and have a SUPER week!!!