Thursday, October 11, 2012

Week 6 Themed Menu and Recipes

I am posting the coming weeks menu and recipes a couple days early.  My family has a busy weekend ahead of us and I wanted to be sure you did not go hungry:) 

Also, my family has had all of the meals below with the exception of Monday, we will be trying that for the first time this week. My family thinks these meals are delicious.  Give them a try!

I know some of you made a few recipes this week.  What did you and your family think?  Will you be making any again?  Will you be putting your own spin on some of them next time?   Fill me in, I am curious!!! 

My brother and sister-in-law made the "Panera Mac-n-Cheese" and added some changes.  They jazzed it up with bacon, Gouda, and hot sauce, they enjoyed it very much.  They did say to add a little less flour for the next time. 

I am also very excited to report that I have increased the views on my blog!  Since I am still gaining new followers I will continue to put the theme and side notes for them and anyone who may need a reminder.

Weekly themes are as follows:

  • Mac-n-Cheese Monday - a jazzed up version of mac-n-cheese each week with a protein
  • Taco Tuesday - Mexican fare
  • Wang Chung Wednesday - Asian fare (sometimes becomes "Wacky Wednesday" and it's pot luck)
  • Tuscan Thursday - Italian cuisine
  • Fish Friday
  • Slow Cooker/Simmer Saturday
  • Sandwich Sundays - this can be anything from burgers to panini's to cold cuts

***Saturday and Sunday are interchangeable depending on your families schedule that week.

As always, at the end of each recipe there will be a link to direct you to the site where I found these meals. You can print from the blog page or from the link that I provided.

Notes

  1. My daughter has a peanut allergy so we substitute and/or omit items that may be in a particular recipe, please do the same if you or anyone in your family has any allergies/dietary needs/personal preference (vegetarian).
  2. Some meals that I put on the menu will be my first time making them as well. So feedback is always appreciated
  3. If there is a meal that I know my kids will not eat I will make a "kid friendly" version of it for them, I will make note of this within the recipe.
  4. All families grocery budgets vary so please adjust ingredients or brands to fit the needs of your family.
  5. The majority of the meals are 30 minutes or less. We all have busy schedules!!!
This weeks menu...

Monday - Butternut Squash Mac and Cheese
 
 
Ingredients
  • 12 ounces dried rigatoni
  • 1 1/2 pounds butternut squash, peeled, seeded and cut into chunks (3 1/2 cups)
  • 2 3/4 cups milk
  • 1/4 cup all-purpose flour
  • ounces smoked Gruyere cheese, shredded (2 cups) (or whatever cheese you have on hand)
  • slices bacon
  • small sweet onion, cut into chunks
  • ounces sourdough bread
  • tablespoons butter, melted
  • fresh flat-leaf Italian parsley
Directions
 
1. Preheat the oven to 425 degrees F. Lightly butter a 3-quart au gratin or baking dish; set aside. Cook pasta according to package directions. Drain; transfer to a large bowl.
 
2. Meanwhile, in a large saucepan combine the squash and 2 1/2 cups of the milk over medium-high heat. Bring to boiling; reduce heat to medium, and simmer until the squash is tender when pierced with a fork, 18 to 20 minutes. Stir together remaining 1/4 cup milk and flour; stir into squash mixture. Bring to boiling; cook until thickened, 2 to 3 minutes. Stir in 1 1/2 cups of the Gruyere (or cheese or choice) until melted; keep warm.
 
3. Meanwhile, in a very large skillet cook bacon until crisp; drain on paper towels. Crumble; set aside. Pour off all but 2 tablespoons bacon drippings. Return skillet to the heat.
 
4. Add onions to skillet; cover and cook over low heat 10 minutes, stirring occasionally. Uncover and increase heat to high. Cook 4 to 6 minutes more, stirring, until onions are golden.
 
5. Add squash-cheese mixture, onions, and bacon to the bowl with the pasta. Toss well to combine, then transfer to prepared baking dish.
 
6. Place bread in a food processor and pulse with two or three on/off turns to form large coarse crumbs (you should have about 2 cups). Transfer to a small bowl; mix with melted butter. Sprinkle remaining Gruyere and the bread crumbs over pasta mixture. over Bake until top is browned, about 14 to 15 minutes. Cool 5 minutes. Sprinkle with parsley.
 
Serves 6 to 8, Ready in 40 minutes
Better Homes and Gardens  butternutsquashmacandcheese
 
Tuesday - Steak (or Chicken) Fajitas w/Chimichurri &
Drunken Peppers w/Spanish Rice


Ingredients


(I am using chicken, because we are having steak tomorrow)
  • 3 poblano peppers, seeded and cut into strips
  • 1/4 cup lager beer
  • 8 8-inch flour tortillas
  • Lime wedges, for serving (optional)
  • 1 box of Near East (or preferred brand) Spanish Rice
  • additional toppings: sour cream and cheese (optional)
  • 1 can of Black Beans, warmed (see note below)
Directions
  1. Combine the parsley and cilantro (leaves and stems), garlic, half of the sliced onion, 1 tablespoon salt, 1 teaspoon pepper, vinegar, 2 tablespoons lemon juice and 1/2 cup olive oil in a food processor; blend into a thick and smooth chimichurri sauce. Pierce both sides of the steak with a fork several times; place in a resealable plastic bag and add half of the sauce. Seal the bag and turn to coat the steak; refrigerate for at least 1 hour. Cover and reserve the remaining sauce.
  2. Preheat a grill to medium-high. Remove the steak from the bag (discard the bag of sauce); season with salt and pepper and grill until medium-rare, about 6 minutes per side. Let rest, loosely covered with foil, for 10 minutes.
  3. Prepare Spanish rice according to package directions.
  4. Meanwhile, heat the remaining 1 tablespoon olive oil in a large skillet over medium-high heat. Add the peppers and the remaining sliced onion half; season with salt and pepper. Saute until the vegetables are softened and caramelized around the edges, about 8 minutes. Add the beer, cover and cook until the peppers are tender, about 5 minutes.
  5. Warm the tortillas on the grill. Thinly slice the steak or chicken on the bias; divide among the tortillas along with the peppers and onions. Thin the reserved chimichurri sauce with the remaining 1 tablespoon lemon juice; drizzle over the fajitas. Serve with lime wedges, if desired.
 
*You can make the marinade and the chimichurri the night before OR in the morning the day of.  This way preparing dinner in the evening will go much faster.
 
*Kid friendly notes:  I will not serve the peppers or additional chimichurri to my kids.  I top their fajitas with sour cream and for extra nutrition I will serve them black beans.
 
Serves 4, Ready in Prep Time: 20 min, Inactive Prep Time: 1 hr 10 min, Cook Time: 25 min
Food Network, Sunny Anderson  fajitaswithchimichurriandpeppers
 
 
Wednesday - Ginger Flank Steak
w/Wasabi Potatoes & Green Beans
 
Ingredients

  • 2 inches fresh ginger root, peeled and grated
  • 1/4 cup tamari aged soy sauce
  • 2 limes, zested and juiced
  • 3 tablespoons vegetable oil, eyeball it
  • 2 tablespoons grill seasoning (recommended: Montreal Steak Seasoning by McCormick)
  • 2 pounds flank steak
  • 2 1/2 to 3 pounds, 4 large potatoes, peeled and cut into chunks
  • Salt
  • 1/4 to 1/3 cup cream
  • 1 to 2 tablespoons wasabi paste - how hot do ya like it?
  • 4 scallions, root end trimmed
  • Handful cilantro leaves
  • 1 package fresh green beans, steamed
Directions
  1. Preheat a grill pan or indoor/outdoor grill to high.
  2. Combine ginger, tamari, lime juice, oil and grill seasoning in a large sealable plastic bag. Add meat to marinade and coat evenly. Let stand 10 minutes then grill meat 6 to 7 minutes on each side. 
  3. Place potatoes in a pot and cover with water. Bring to a boil, salt the potatoes and cook until tender, 10 to 12 minutes. Drain potatoes and add them back to the hot pot. Smash the potatoes with a masher to desired consistency with the cream, adjust salt, to taste, set aside kids portions, then add the wasabi as hot as you like it.
  4. Steam green beans and season to taste.
  5. While potatoes and meat cook, finely chop the scallions together with cilantro and lime zest.
  6. Let meat rest 5 minutes then thinly slice on an angle against the grain. Serve meat on mash potato mounds with a garnish with a generous sprinkling of the chopped scallion-cilantro-lime zest and a side of green beans.
*Kid friendly note: in the recipe I stated to set aside the kids portion of potatoes before adding the wasabi for the "grown ups".  I will also skip the scallion-cilantro-lime zest for kids servings.

Serves 4, Ready in 30 minutes
Rachael Ray 30 Minute Meals  gingerflanksteakwithwasabipotatoes


Thursday - White Bean and Pancetta Soup
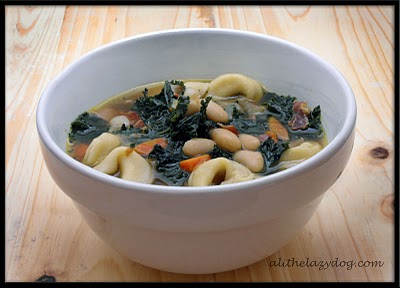
 
Ingredients
  • 3 tablespoons olive oil
  • 4 ounces pancetta, chopped
  • 3 large shallots, chopped
  • 1 carrot, peeled and chopped
  • 2 garlic cloves, chopped
  • 1 (15 ounce) can cannellini beans, rinsed and drained
  • 4 cups chopped Swiss chard (1 bunch) (you can also use spinach)
  • 6 cups low-sodium chicken broth
  • 1 (9 ounce) package cheese tortellini
  • 1/4 teaspoon freshly ground black pepper
Directions
  1. In a large, heavy soup pot, heat the olive oil over medium-high heat. Add the pancetta, shallots, carrot, and garlic and cook until the pancetta is crisp, about 5 minutes, stirring occasionally. Add the beans, Swiss chard (or spinach), and broth.
  2. Bring the soup to a boil over medium-high heat, then reduce the heat to a simmer. Add the tortellini and cook 5 minutes for fresh, 8 minutes for frozen, or until just tender. Season with pepper and serve.
  3. Serve with fresh italian bread, parmesan cheese, and extra virgin olive oil.
Serves 4, Ready in 30 minutes
Giada DeLaurentiis, recipe from tastebook.com  whitebeanandpancettasoup
 
 
Friday - Elsa's Favorite Fish
 
 
Ingredients
  • 2 tablespoons EVOO - Extra Virgin Olive Oil
  • 4 scallions, thinly sliced
  • 1/2 cup Italian parsley, chopped
  • 1 teaspoon fennel seeds
  • 3/4 cup white wine
  • 1 15-ounce can diced tomatoes
  • 1/4 cup clam juice
  • 4 large, center-cut cod or haddock filets
  • Salt and freshly ground black pepper
  • 1 pound fettuccine, linguini or pappardelle
  • 3 tablespoons butter, softened at room temperature
  • 3 tablespoons flour
  • 2 tablespoons balsamic vinegar
  • 1/4 cup cream
  • 1 cup (about 2 large handfuls) shredded basil
 
Directions
 
  1. Preheat oven to 350ºF and place a large pot of salted water over high heat to boil for the pasta.
Step
    2.  Place a large, oven-safe skillet over medium-high heat with the EVOO. Add the scallions, parsley and fennel seeds to the pan and cook until the scallions are tender, about 1 minute. Add the white wine and let it cook about 1 minute until most of the liquid is reduced away.
Step
    3.  Add the diced tomatoes and clam juice to the pan along with the fish, some salt and freshly ground black pepper. Bring the liquids up to a bubble, and then put a lid on the pan (or some aluminum foil if you don't have a lid) and transfer it to the oven. Bake until the fish is cooked through, 15-20 minutes.

   4.  When the fish has about 5 minutes of cooking time left, drop the pasta into the boiling water and cook to al dente according to package directions. Once it has finished cooking, drain the pasta and reserve it in the colander until the sauce is finished.

   5.  When the fish has finished cooking, remove it to a plate and cover it with foil to keep warm. Return the pan of sauce to the stove over medium-high heat and bring up to a bubble. Simmer until some of the liquid has reduced away, 2-3 minutes.
Step    6.  While the liquids are reducing, stir together the softened butter with the flour in a small bowl. Toss the mixture into the pan and whisk to combine to thicken the sauce. Stir in the balsamic vinegar, cream and basil, and remove the pan from the heat.
 
   7.  To serve, pour half of the sauce over the fish and toss the cooked pasta in the remaining half.
 
Serves 4, Ready in 35 minutes
Rachael Ray Show  elsasfavoritefish
 
 
Saturday - Creamy Rice and Mushroom Soup
 
Ingredients
  • 1 ounce dried mushrooms, any variety
  • 6 cups chicken broth
  • 3 tablespoons extra-virgin olive oil
  • 6 carrots, coarsely chopped
  • 1 onion, coarsely chopped
  • 2 tablespoons chopped fresh sage
  • Salt and pepper
  • 1 6 ounce box long-grain and wild rice mix
  • 3/4 pound white mushrooms, sliced
  •  2-3 skinless, boneless chicken breast, thawed
  • 1/2 cup heavy cream

Directions
  1. Using a food processor, soak the dried mushrooms in 1 cup chicken broth for 10 minutes. Process until coarsely chopped, about 20 seconds.
  2. In a large pot, heat the olive oil over medium-high heat. Add the carrots, onion and sage and cook, stirring, until crisp-tender, about 5 minutes. Add the rehydrated mushroom mixture and cook, stirring, for 1 minute; season with salt and pepper.
  3. Stir in the remaining 5 cups broth, the rice mix and the sliced mushrooms and bring to a boil. Add the chicken breast, lower the heat and simmer, stirring occasionally, until the rice is tender and the chicken breast is cooked through, about 25 minutes. Transfer the chicken to a plate and shred; return to the pot. Stir in the heavy cream; season with salt and pepper and simmer for about 5 minutes.

*If you have extra FREEZE IT, label it, and use later!!!

*You can also slow this down and transfer to a crock pot and cook on low for 6 hours, stirring in heavy cream the last 5 minutes.
 
Serves 6, Ready in 35 minutes
Rachael Ray Magazine  creamywildriceandmushroomsoup
 
 
Sunday - Bacon, Peach, and Arugula Sandwiches
 
Ingredients

  • 8 slices thick-cut bacon
  • 1/4 cup packed fresh basil
  • 2 tablespoons extra-virgin olive oil
  • 1 teaspoon fresh lemon or lime juice
  • Kosher salt and freshly ground pepper
  • 3 tablespoons mayonnaise
  • 8 thick slices multigrain bread, or bread of choice (we use Texas Toast)
  • 2 peaches, halved, pitted and thinly sliced
  • Baby arugula, for topping (if you used spinach on Thursday and have some left, use that)
  • Cornichons or other pickles, for serving (optional)
*Increase ingredients accordingly, if making enough for seconds.

Directions
  1. Cook the bacon in a large skillet over medium heat, turning a few times until crisp, about 8 minutes. Transfer to a paper towel-lined plate to drain, then cut each slice in half.
  2. While the bacon is cooking, pulse the basil, olive oil, lemon juice, 1 tablespoon water, 1/4 teaspoon salt, and pepper to taste in a mini food processor (or finely chop the basil and whisk with the other ingredients) until smooth. Add the mayonnaise and pulse until just combined.
  3. Toast the bread and spread evenly with the basil mayonnaise. Divide the peaches, bacon and arugula among half of the bread slices; top with the remaining bread slices. Serve with cornichons.
  4. Serve with your side of choice.
Serves 4, Ready in 20 minutes
 
Hope you enjoy and have a SUPER week!!!


Tuesday, October 9, 2012

Kitchen Utensil and Gadget Organization

Since you have already seen my dirty laundry (sorting system) it seems only natural that you see the inside of my drawers...kitchen drawers, that is!!!

I was personally asked to write a post about organizing all those kitchen utensils and gadgets that we all have.  I was flattered and could not wait to write this post. 

All kitchens are not created equal.  My kitchen drawers are enormous (28 x 21 x 4) and make organizing all the utensils easy.  For others, it may take some creativity to get these things organized.  I have one drawer that fits all the utensils I have.  I purchased 4 RE (Room Essentials) drawer organizers from Target.  I would suggest purchasing all the same color so it looks "pretty" while being functional. 

***Before heading to the store, make sure to measure your drawer so you know how many of these organizers you can fit.

I separated the utensils by their function.   
Bin #1 is for miscellaneous such as: peeler, sifter, can opener, ice cream scoop, and BBQ brush
Bin #2 for soup ladles, plastic/wooden spoons, and slotted spoons
Bin #3 for tongs and plastic spatulas
Bin #4 for silicone/wooden spatulas and whisks

This drawer still has room so I push the bins back and I have the perfect amount of space for the measuring cups and measuring spoons. 

I have also been able to do this with the silverware drawer, because it is just as big as the utensil drawer.  I did this at a later date and the bins are black instead of white.  I figured I could live with that since they are separate drawers.


While I was on Pinterest "researching" for this wonderful blog, I did come across some other fabulous drawer organizing ideas.  Some of these you may prefer or they may even fit your drawers better than the organizers I use.  

One really cool option is to store things diagonally.  Again, I saw this on Pinterest via thekitchn.com. 
 
This idea was originally seen on This Old House, but you can purchase these inserts from diamondcabinets.com starting at $75.  That seems pricey for inserts so you can easily make your own.  Go to a hardware store and purchase balsa wood and cut it them to the size that you need for your drawers.  Then adhere them with wood glue.

If your drawer is not big enough for the RE bins or to place utensils diagonally, you could also use the balsa wood and cut them to size for vertical placement.  However, if you are short on time to complete this project you could also purchase these expandable wood kitchen drawer dividers from organizeit.com, or Amazon.  They are around $21 for a set of 2.

 
Another great option to put utensils in their place, and keep them there, is by purchasing the DrawerDecor.  I have seen these on Amazon for around $25.  They come in a variety of fun colors and sizes for a perfect fit.  They stick to the bottom of the drawer and the utensils stay where you put them. 
 
 
I saw this awesome idea for utensil and silverware storage.  It is custom ordered but such a great way to double your storage space.  It is a Two-Tier Wood Cutlery Tray to organize silverware and utensils on two levels within the drawer.  It is from Dura Supreme Custom Cabinetry.  I am sure you can find other companies and options with the two-tiered system.
 
 
If all else fails and you are out of drawer storage but have ample counter space you could always put your utensils on "display". 
 
This are so many options to organize your kitchen utensils and gadgets.  It may be a simple solution or take a little bit of imagination, but I am giddy thinking about all the ways it can be done.


Sunday, October 7, 2012

MORE "Make Ahead" Meal Ideas

courtesy of my organized cousin Stephanie,
it runs in the family;)
Last week I posted the first of many "make ahead" meal ideas.  As I stated before, I usually take a Sunday or two a month and make a few meals that I can freeze for further use. 

This week are meals that I have made in previous posts.  When I make these meals during the week, I make DOUBLE and then freeze half.  It's double duty and it frees up even more time!!! 

Even if it is a crock pot meal I will still make double, because I already have the ingredients on hand.  Then, when I want to use one of the meals, only reheating is necessary. This usually only takes about 30 minutes, opposed to another 6-8 hours in a crock pot.

In previous posts, I have made double of Italian Chili, Chicken Noodle Soup, and Chicken Tortilla Soup.  The recipes are repeated below. 

*NOTE: Make sure to double the recipes if using for dinner that evening and freezing for another "make ahead" meal.

 
Italian Chili
(From Sandra Lee Semi-Homemade)

Ingredients
· 1-lb of lean ground beef
· ½-lb of Italian sausage
· 1-chopped onion
· 1-chopped green pepper
· 3-cloves of garlic, minced
· 1-28oz. can of Italian style tomatoes
· 1-15oz. can of chickpeas (garbanzo beans), drained
· 1-15oz. can of light kidney beans, drained
· 1 cup of water
· 3 tbls of Worcestershire
· 2-3 tbls of chili powder
· 2 tsp. of dried basil
· 2 tsp. of dried oregano
· ½ tsp. of hot sauce (or more if you like it spicy)
· ¼ tsp. of salt

Directions
1. In a large skillet cook ground beef and Italian sausage, breaking them up while it cooks, add onion, green pepper, and garlic. Once the meat is cooked drain.
2. In crock pot combine meat mixture, undrained tomatoes, chickpeas, kidney beans, water, Worcestershire, chili powder, basil, oregano, hot sauce, and salt.
3. Cover and cook on low for 6-8 hours or on high for 3-4 hours.
4. At this point, if freezing, let soup cool slightly, then divide into freezer containers and label with date, meal, and reheating instructions.


Chicken Noodle Soup


Ingredients:
  • 1 large rotisserie chicken, shredded
  • 1 large onion, chopped
  • 2-3 medium carrots, chopped
  • 2 stalks of celery, chopped
  • 1 tablespoon of basil
  • Salt & Pepper to taste
  • 4 quarts of chicken stock or 16 cubes chicken bouillon and  16 cups water to desired taste
  • 1 bag of wide egg noodles, cooked
  • 2-1/4 cups of Bisquick
  • 2/3 cup of milk
Directions:
  1. Place shredded chicken, onions, carrots, celery, basil, s&p, and stock into a pot.
  2. Bring to a boil, then simmer for and hour.
  3. Cook egg noodles according to package directions.  Combine noodles with soup before freezing.
  4. At this point, if freezing, let soup cool slightly, then divide into freezer containers and label with date, meal, and reheating instructions.  *If you are serving this tonight, continue with the dumplings.
For Dumplings:
  1. Take thawed soup and bring up to a boil.
  2. Combine Bisquick and milk to until soft dough forms, then drop by spoonfuls onto boiling soup for 10 minutes. Then reduce heat, cover soup and cook for 10 minutes longer.
 
Slow Cooker Chicken Tortilla Soup
 
 
Ingredients
  • 1 can black beans, drained
  • 1 can corn, drained
  • 1 can diced tomatoes (14.5 oz size – southwest style, if possible I used petite diced tomatoes w/ sweet onion)
  • 1 packet enchilada sauce mix (or if you can’t find this, mild taco seasoning works well too, this is what I used)
  • 1 1/2 C water
  • 1 can (8 oz)tomato sauce
  • 1 can ( 10 3/4 oz) cream of chicken soup
  • 2 C milk
  • 3-4 boneless chicken breast
Directions
  1. In crock pot, mix the enchilada packet together with the water and tomato sauce. Add cream of chicken soup and milk and whisk together until smooth.
  2. Add chicken. Pour drained black beans, drained corn and diced tomatoes on top of that.
  3. Cook on low 6-8 hours.
  4. Before serving or freezing, take out chicken and shred or dice, then put back and stir it all together.
  5. At this point, if freezing, let soup cool slightly, then divide into freezer containers and label with date, meal, and reheating instructions.
  6. When ready to serve, thaw, reheat and serve with sour cream, shredded cheddar cheese, lime, avocado, or tortilla chips.

Now you have 3 more meals in your back pocket!!!  Don't forget to add those to your freezer inventory:)

Saturday, October 6, 2012

Week 5 Menu & Recipes

I hope that you all had a great week!  Please do not be shy, any meals that you and your family have tried from previous menus feel free to comment on.  If you added anything extra or omitted any specific ingredients let us know.  I am always looking to improve meals, and since these recipes are not mine it is helpful to hear other ideas.

Here is this weeks menu...

Weekly themes are as follows:
  • Mac-n-Cheese Monday - a jazzed up version of mac-n-cheese each week with a protein
  • Taco Tuesday - Mexican fare
  • Wang Chung Wednesday - Asian fare (sometimes becomes "Wacky Wednesday" and it's pot luck)
  • Tuscan Thursday - Italian cuisine
  • Fish Friday
  • Slow Cooker/Simmer Saturday
  • Sandwich Sundays - this can be anything from burgers to panini's to cold cuts
***Saturday and Sunday are interchangeable depending on your families schedule that week.
 
As always, at the end of each recipe there will be a link to direct you to the site where I found these meals. You can print from the blog page or from the link that I provided.

Notes
  1. My daughter has a peanut allergy so we substitute and/or omit items that may be in a particular recipe, please do the same if you or anyone in your family has any allergies/dietary needs/personal preference (vegetarian).
  2. Some meals that I put on the menu will be my first time making them as well. So feedback is always appreciated
  3. If there is a meal that I know my kids will not eat I will make a "kid friendly" version of it for them, I will make note of this within the recipe.
  4. All families grocery budgets vary so please adjust ingredients or brands to fit the needs of your family.
  5. The majority of the meals are 30 minutes or less. We all have busy schedules!!!

Monday - Farfalle w/Creamy Mushroom Gorgonzola Sauce
tastebook.com

*You can serve this alongside a steak of your choice or grilled sliced chicken.
 
Ingredients
  • 2 tbsp unsalted butter
  • 3 tbsp all-purpose flour
  • 2 1/2 cups whole milk, at room temperature
  • 5 oz creamy Gorgonzola cheese, cubed
  • 3 tbsp extra-virgin olive oil
  • 1 lb assorted mushrooms, sliced (see below)
  • 3/4 cup defrosted frozen peas
  • 1 box (16 oz) farfalle pasta
  • 3-4 boneless chicken breast, grilled and sliced OR steak of your choice
  •  
Directions
  1. Bring a large pot of salted water to a boil. Melt butter in a 2 quart saucepan over moderate heat. Add flour and whisk until smooth, about 2 minutes. Gradually whisk in milk. Bring the sauce to a simmer and simmer for 2 minutes, whisking constantly. Remove from heat. Add cheese and stir until melted. Season with salt and pepper to taste. Cover and set aside.
  2. Heat oil in a large skillet over moderate heat until hot. Add mushrooms and saute until tender and golden, about 12 minutes. Stir in peas (and grilled chicken, if using). Season with salt and pepper to taste.
  3. Meanwhile, add pasta to boiling water and cook until al dente, about 10 minutes. Drain.
  4. Transfer to a large bowl. Add the Gorgonzola sauce and mushroom mixture, and toss to coat. Season with salt and pepper to taste.
  5. Serve dish in a shallow bowl or on a plate alongside a steak (if you choose)
*My kids do not like mushrooms, so I only put in half the amount called for and chop very small so they do not notice the mushrooms are in this dish...tricky:)
 
Serves 4-6, Ready in 25 minutes
Giada DeLaurentiis, Everyday Pasta. 
Recipe was obtained from Tastebook and Jackie Opitz 
 
 
Tuesday - Chili Suizas Bake &
Ground Chicken Quesa's for the kids


Ingredients

  • 3 large poblano peppers
  • 2 tablespoons extra-virgin olive oil, 2 turns of the pan
  • 2 pounds ground chicken
  • 1 onion, chopped
  • 1 jalapeno, seeded and finely chopped
  • 4 cloves garlic, finely chopped
  • 12 large or 16 medium to small tomatillos, peeled, rinsed and halved
  • (the short cut to this process is using store bought salsa verde)
  • 1/4 cup cilantro, a handful
  • 2 cups chicken stock (reduce amount of stock if you want it thicker)
  • 2 teaspoons honey
  • Salt and pepper
  • 1 lime, juiced
  • 1/2 cup creme fraiche or sour cream
  • 3 cups lightly crushed tortilla chips --whole-grain tortilla chips, such as flax seed tortillas add a wonderful texture and flavor
  • 1 cup shredded Swiss cheese, about 1/3 pound
  • 1 cup shredded Monterey Jack cheese, about 1/3 pound
 
Directions
  1. Heat the broiler to high. Place the poblanos under hot broiler and char until blackened an all sides, 10 to 12 minutes. Leave the door of the oven cracked to allow the steam to escape. Place the peppers in a bowl and cover tightly with plastic wrap. Allow the peppers to cool enough to handle.
  2. While peppers char, heat extra-virgin olive oil in a high sided skillet over medium-high heat. Add chicken and lightly brown, 3 to 4 minutes (if using alternative for kids, save some chicken for quesadillas). Stir in onions, jalapeno and garlic and cook to soften onions about 5 minutes. While onions cook, place tomatillos and cilantro in the food processor and process until smooth (unless you are using store bought). Pour the tomatillos into the chicken mixture and stir to combine. Stir in chicken stock and honey, season with salt and pepper and simmer chili 10 minutes.
  3. When poblano peppers are cool enough to handle, remove seeds and chop, stir into chili. Remove chili pan from heat and stir in lime juice. Add dollops of creme fraiche or sour cream on top of the chili, placing spoonfuls evenly across the pan. Cover the pan with a layer of crushed chips and top with Swiss and Monterey Jack cheeses. Place under broiler until brown and bubbly. Serve from hot skillet, spooning out chili into shallow dinner bowls.
*Alternative for the kids: use the reserved, cooked ground chicken and make chicken and cheese quesadilla's for them. 
 
Serves 6, Ready in 30-40 minutes
Rachael Ray, Food Network  chilisuizas
 
 
Wednesday - Sweet n Sour Sirloin Stir-Fry
w/Ranch Mashed Potatoes
foodnetwork.com


Ingredients

  • 1 1/2 pound piece sirloin or flank steak, 1-inch thick
  • 2 pounds Idaho or red potatoes, peeled and cubed (i prefer red)
  • Salt
  • 3 tablespoons vegetable, peanut or canola oil
  • 2 large red bell peppers, seeded and sliced
  • 1 large green bell pepper, seeded and sliced
  • 1 bunch scallions, cut into 2 to 3-inch pieces on bias, greens and whites
  • 2 cups shelled frozen edamame
  • 3 tablespoons brown sugar
  • 3 tablespoons soy sauce
  • 1/4 cup yellow mustard
  • 1/4 cup ketchup
  • 2/3 cup buttermilk
  • Freshly ground black pepper
  • A few dashes hot sauce
  • Handful fresh flat-leaf parsley, chopped
  • Handful fresh dill, chopped
  • Handful fresh chives, chopped

Directions

  1. Pop the meat in the freezer for a few minutes to stiffen it up for slicing.
  2. Place potatoes in a pot and cover with cold water. Bring water to a boil. Salt the water and cook the potatoes until tender, 12 to 15 minutes. Drain.
  3. Halve the steak lengthwise then very thinly slice the meat. Heat the oil in a very large skillet over high heat. When oil wafts smoke and ripples, add the meat and stir-fry until caramelized 3 minutes. Add peppers and stir-fry 2 minutes then add in scallions and edamame for 2 minutes more. Stir together the sugar, soy, mustard and ketchup and pour over stir-fry the last minute of cooking. Season, to taste, if necessary.
  4. Mash potatoes with buttermilk, salt and pepper, hot sauce, parsley, dill, chives, adjust seasoning with salt and pepper, to taste, and serve with stir-fry on top!
Serves 4, Ready in 30 minutes
Rachel Ray, Food Network  sweetnsoursirloin
 
 
Thursday - Crock Pot Lasagna & Side Salad
creatingthroughlife
 
 
Ingredients
  • 1 lb. ground beef
  • 29 oz can tomato sauce
  • 8 oz pkg. lasagna noodles, uncooked
  • 4 cups shredded mozzarella cheese
  • 1 1/2 cups cottage cheese
*See variations below
 
Directions
1. Spray the inside of the crock-pot with cooking spray
2. Brown the ground beef
3. Stir the tomato sauce in with the ground beef
4. Spread 1/4 of the meat sauce on the bottom of the crock-pot
5. Arrange 1/3 of the uncooked noodles over the sauce (I usually break them up so they fit better)
6. Combine the cheeses in a bowl. Spoon 1/3 of the cheeses over the noodles.
7. Repeat these layers twice
8. Top with remaining sauce
9. Cover and cook on low for 4hrs (I've started the crock-pot on high in the morning before I leave for work and then put it on warm when I leave and it's perfect when I get home)
10. Let the lasagna stand in the crock-pot with the lid off for at least 10 minutes
* Variations *
1. Add chopped onion and garlic to the ground beef in step 2
2. Use Italian sausage in place of ground beef or with ground beef
3. Add 1/2 cup grated Parmesan cheese to the cheese mixture. Replace cottage cheese with Ricotta.
4. Add 1/2 cup additional shredded mozzarella cheese to the top of lasagna 5 minutes before serving
 
***Serve this with a simple spinach or tossed salad
 
Serves 4, Ready in 4-6 hours
Creating Through Life  crockpotlasagna


Friday - Salmon w/Citrus Dijon Spinach
rachaelrayshow
 
 
Ingredients
  • 1 grapefruit and zest, divided
  • 2 oranges and zest, divided
  • 1 cup slivered almonds, toasted (optional)
  • 4 to 5 tablespoons extra-virgin olive oil (EVOO), divided
  • 4 salmon filets (about 6 ounces each)
  • 1 red onion, thinly sliced
  • 1 tablespoon Dijon mustard
  • 3 tablespoons white wine vinegar
  • Salt and black pepper
  • 1 bag of spinach
Directions
  1. After zesting the grapefruit and oranges, slice the peel and pith off, cut fruit into slices and reserve.
  2. Preheat a small skillet over medium heat to toast the slivered almonds.
  3. Preheat a large skillet over medium-high heat with a few turns of the pan of EVOO, about 3 tablespoons. Season the fish filets with salt and pepper, and transfer to the hot skillet. Cook for 4-5 minutes on each side or until cooked to desired doneness.
  4. Meanwhile, preheat another large skillet with two turns of the pan of EVOO, about 2 tablespoons, over medium heat. Add the red onion, the orange and grapefruit zest, mustard and white wine vinegar. Season with some salt and pepper. Just before you are ready to plate, add in the spinach and toss.
  5. Divide the citrus spinach between your serving plates, top with the seared salmon and sprinkle with the toasted almonds. Garnish with grapefruit and orange slices.
*Kid alternative: I will serve spinach mixture on the side of salmon instead under the salmon.
 
Serves 4, Ready in 30 minutes
Rachel Ray Show  searedsalmonandspinach
 
 
Saturday - Slow Cooker Chicken Tortilla Soup
 
 
Ingredients
 

  • 1 can black beans, drained
  • 1 can corn, drained
  • 1 can diced tomatoes (14.5 oz size – southwest style, if possible I used petite diced tomatoes w/ sweet onion)
  • 1 packet enchilada sauce mix (or if you can’t find this, mild taco seasoning works well too, this is what I used)
  • 1 1/2 C water
  • 1 can (8 oz)tomato sauce
  • 1 can ( 10 3/4 oz) cream of chicken soup
  • 2 C milk
  • 3-4 boneless chicken breast
Directions
  1. In crock pot, mix the enchilada packet together with the water and tomato sauce. Add cream of chicken soup and milk and whisk together until smooth.
  2. Add chicken. Pour drained black beans, drained corn and diced tomatoes on top of that.
  3. Cook on low 6-8 hours.
  4. Before serving, take out chicken and shred or dice, then put back and stir it all together.
  5. Serve with sour cream, shredded cheddar cheese, lime, avocado, or tortilla chips.
Serves 4, Ready in 6-8 hours
Real Mom Kitchen  crockpotchickentortillasoup


Sunday - Salami & Gouda Panini on Ciabatta
w/Veggie of Choice
bravotv.com
 
 
Ingredients
  • 2 tablespoons orange blossom honey
  • 1 teaspoon dry mustard
  • 4 small sun-dried tomato rolls (or ciabatta-type rolls), split in half
  • 8 thin slices Genoa salami
  • 8 thin slices sharp Gouda
  • 4 strips jarred roasted red bell pepper
  • 2 tablespoons unsalted butter, melted
  • Vegetable of your choice
 
Directions
  1. Heat a panini press according to the manufacturer’s directions until hot. (Alternatively, heat a ridged grill pan over medium heat.)
  2. In a small bowl, whisk together the honey and mustard and spread it over 2 of the bread halves. Top with 4 slices of salami, 4 slices of cheese, and 2 red pepper strips each and top with the other half of the roll.
  3. Brush the butter on the outside of the sandwiches, top and bottom. Put the sandwiches on the press, then pull down the top and cook until browned and crisp, 4 to 6 minutes. If you’re using a grill pan, place a heavy pan on top of the sandwiches and cook, pressing down on the pan and turning the sandwiches once. Cut the sandwiches in half and serve immediately.
  4. Serve with your favorite veggie.
*I increase the ingredients to make enough for 6 sandwiches. 
*You can omit roasted red peppers for the kids sandwiches.
 
Serves 4, Ready in 15 minutes
Top Chef, Season 1, Dave Martin  salamiandgoudapanini
 
 
Hope you enjoy and have a SUPER week!!!
 

Thursday, October 4, 2012

Inventory Your Freezer


For about 5 years now I have been keeping inventory of our deep freezer.  I thought that this post would be a great "tie in" from Sundays post of "Make Ahead Meals".

Having a deep freeze or extra freezer is great but once it is stocked how do you remember what you put in there?  Our freezer is in the basement and when it came time to make grocery lists and menus I did not want to go downstairs to check what we had on hand.  Thus, we started to keep an inventory of our deep freezer.  I have a truly generic inventory system that is hand written in alphabetical order (thanks to the hubby) and posted to the refrigerator in the kitchen. 


fitnessfoodmotivation


However, when I was getting ready to write this post I did a little "research" on home freezer inventory and WOW, there are people out there more organized than me!  Hard to believe, I know, but I came across a variety of printable sheets that you could use as your own inventory list.  The one on the left and another great one I found is from smartshoppingladies.com.

My list (on the right) is 5x7 and placed in a magnetic photo holder so it does not take up a lot of space.  Once we take something from the deep freeze we simply adjust the amount on the inventory sheet.  After the freezer has been run down and we restock we make another inventory sheet.  This is every few months. 

Depending on where your extra freezer is located there is a system that would work best for your situation.  A few ideas that you could use would be to hang an inventory list with the extra freezer, or have a list by each freezer to cross reference the items as you use them.  If your tech savvy you could have the inventory list on your cell phone using the notepad or one of the many home maintenance apps and adjust it from wherever you please.

However you choose to keep an inventory of all the "make ahead" meals and groceries you buy for the deep freeze is up to you, but it will definitely save you time and money.